CO-READIT Documentation
Welcome to CO-READIT! Thank you for purchasing our advanced community discussion platform. This comprehensive guide will walk you through the installation, configuration, and management of your CO-READIT community.
CO-READIT is a feature-rich Reddit-style community platform that allows you to create vibrant, interactive communities called "Circles" with threaded discussions, real-time notifications, user voting systems, comprehensive moderation tools, AI-powered features, a complete wallet and monetization system, and much more.
Important: Please read this documentation thoroughly before installation. Keep this document handy as a reference throughout your setup process.
What's Included
- Complete CO-READIT source code
- Database schema and migrations
- Installation wizard
- Multi-language support (11 languages included)
- Comprehensive admin panel
- This documentation
Server Requirements
Before installing CO-READIT, ensure your server meets the following requirements:
Minimum Requirements
| Component | Requirement | Notes |
|---|---|---|
| PHP Version | 8.1 or higher | PHP 8.2+ recommended for better performance |
| MySQL | 5.7 or higher | MariaDB 10.3+ also supported |
| Web Server | Apache 2.4+ or Nginx 1.18+ | URL rewriting must be enabled |
| Memory Limit | 128MB minimum | 256MB+ recommended |
| Max Upload Size | 10MB minimum | 64MB+ recommended for media uploads |
| Max Execution Time | 120 seconds | Required for installation and backups |
| Disk Space | 500MB minimum | More space needed for user media |
Required PHP Extensions
mysqli- Database connectivity (critical)pdo&pdo_mysql- PDO database driver (critical)mbstring- Multi-byte string support (critical)gd- Image processingcurl- External API requests (critical)zip- Backup functionalityfileinfo- File type detection (critical)json- JSON data handling (critical)openssl- Secure connections (critical)session- Session management (critical)
Directory Permissions
The following directories must be writable (chmod 755 or 775):
storage/- Main storage directorystorage/cache/- Application cachestorage/logs/- Log filesstorage/sessions/- Session filesstorage/uploads/- User uploaded mediastorage/thumbnails/- Generated thumbnailsstorage/backups/- System backups
Tip: The CO-READIT installer will automatically check all requirements and provide detailed feedback on any missing components.
External Services (Optional)
To enable certain features, you'll need accounts with these services:
| Feature | Service | Required Credentials |
|---|---|---|
| Livestream & Spaces | Agora.io | App ID, App Certificate |
| AI Features | gemini, Anthropic, deepseek, open ai | API Key |
| Payments (Cards) | Stripe | Public Key, Secret Key, Webhook Secret |
| Payments (PayPal) | PayPal | Client ID, Client Secret |
| Payments (Crypto) | CoinPayments | Merchant ID, IPN Secret |
| Push Notifications | Firebase | Service Account JSON, VAPID Key |
| Email (SMTP) | Any SMTP provider | Host, Port, Username, Password |
Installation & Setup
Follow these steps carefully to install CO-READIT on your server.
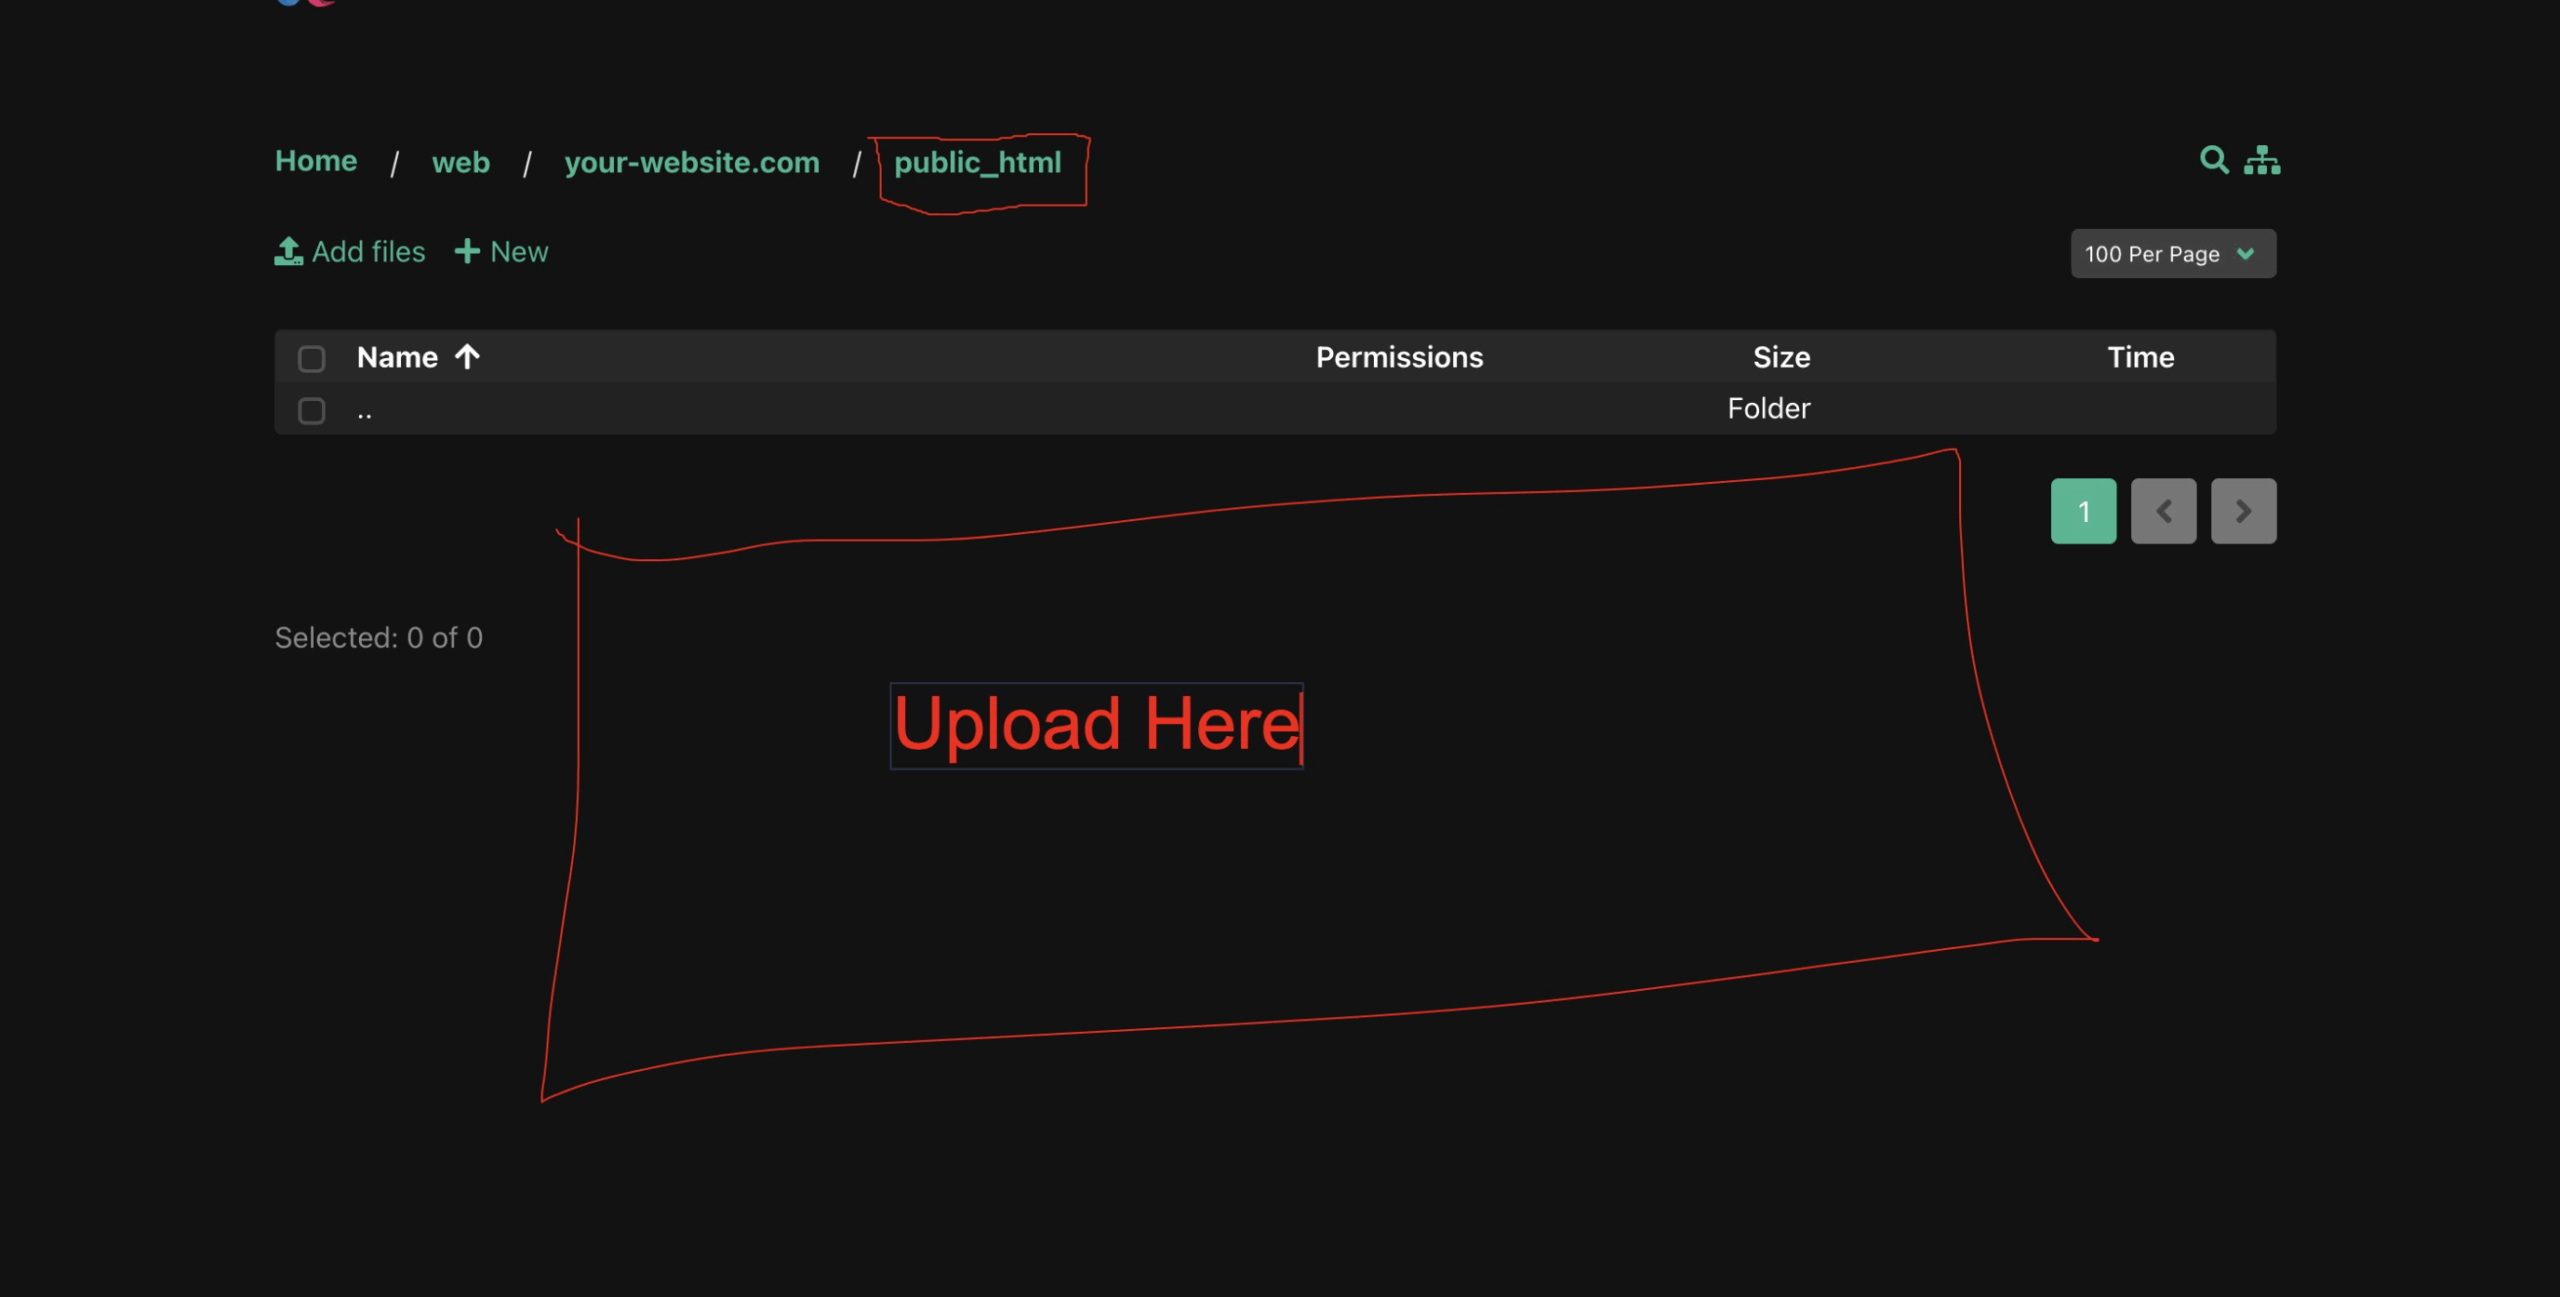
1. Upload Files to Server
- Extract the CO-READIT package you downloaded from edubrazeal.com to your local computer
- Connect to your server via FTP/SFTP using FileZilla, WinSCP, or cPanel File Manager
- Navigate to your website's root directory (usually
public_htmlorwww) - Upload all extracted files to this directory
- Wait for all files to upload completely (this may take several minutes)
Important: Make sure to upload all files including hidden files like .htaccess
2. Run the Installation Wizard
- Open your web browser and navigate to:
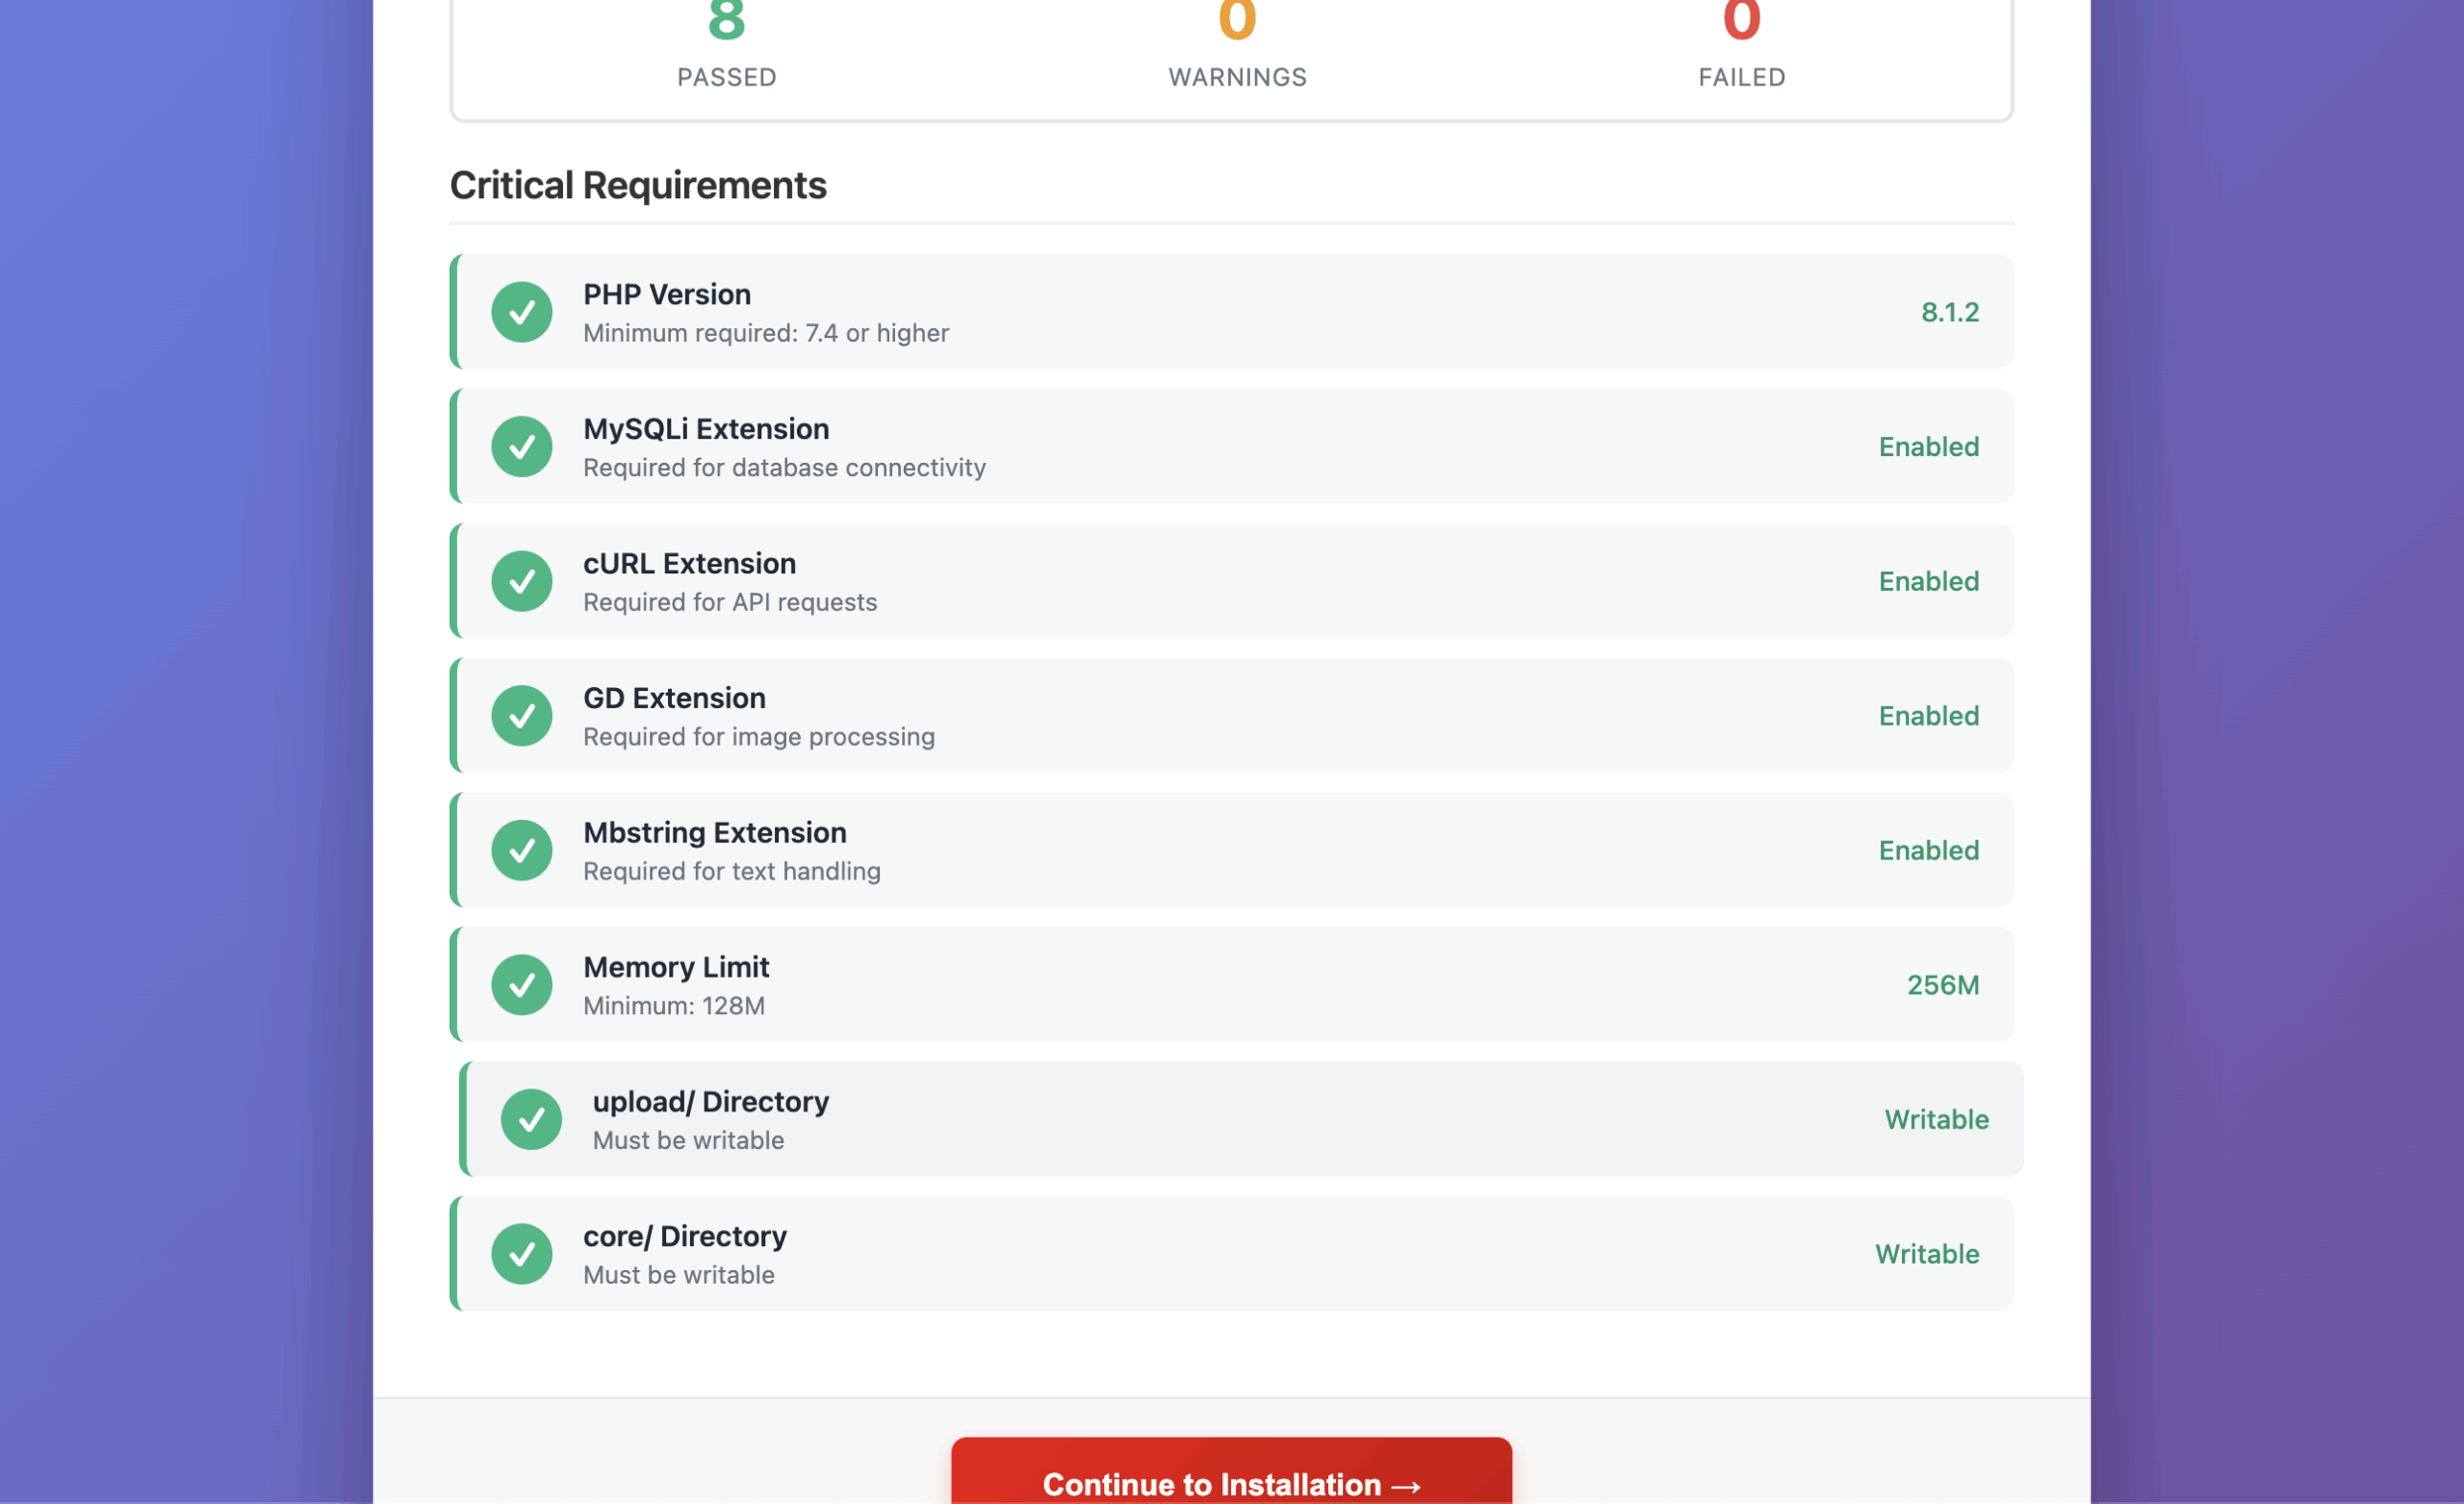
https://yourdomain.com/install.php - The installer will perform an automatic server requirements check
- Review all requirements - critical items must pass (green checkmarks)
- If any critical requirement fails, contact your hosting provider
- Once all checks pass, click "Continue to Installation"
3. Database Configuration
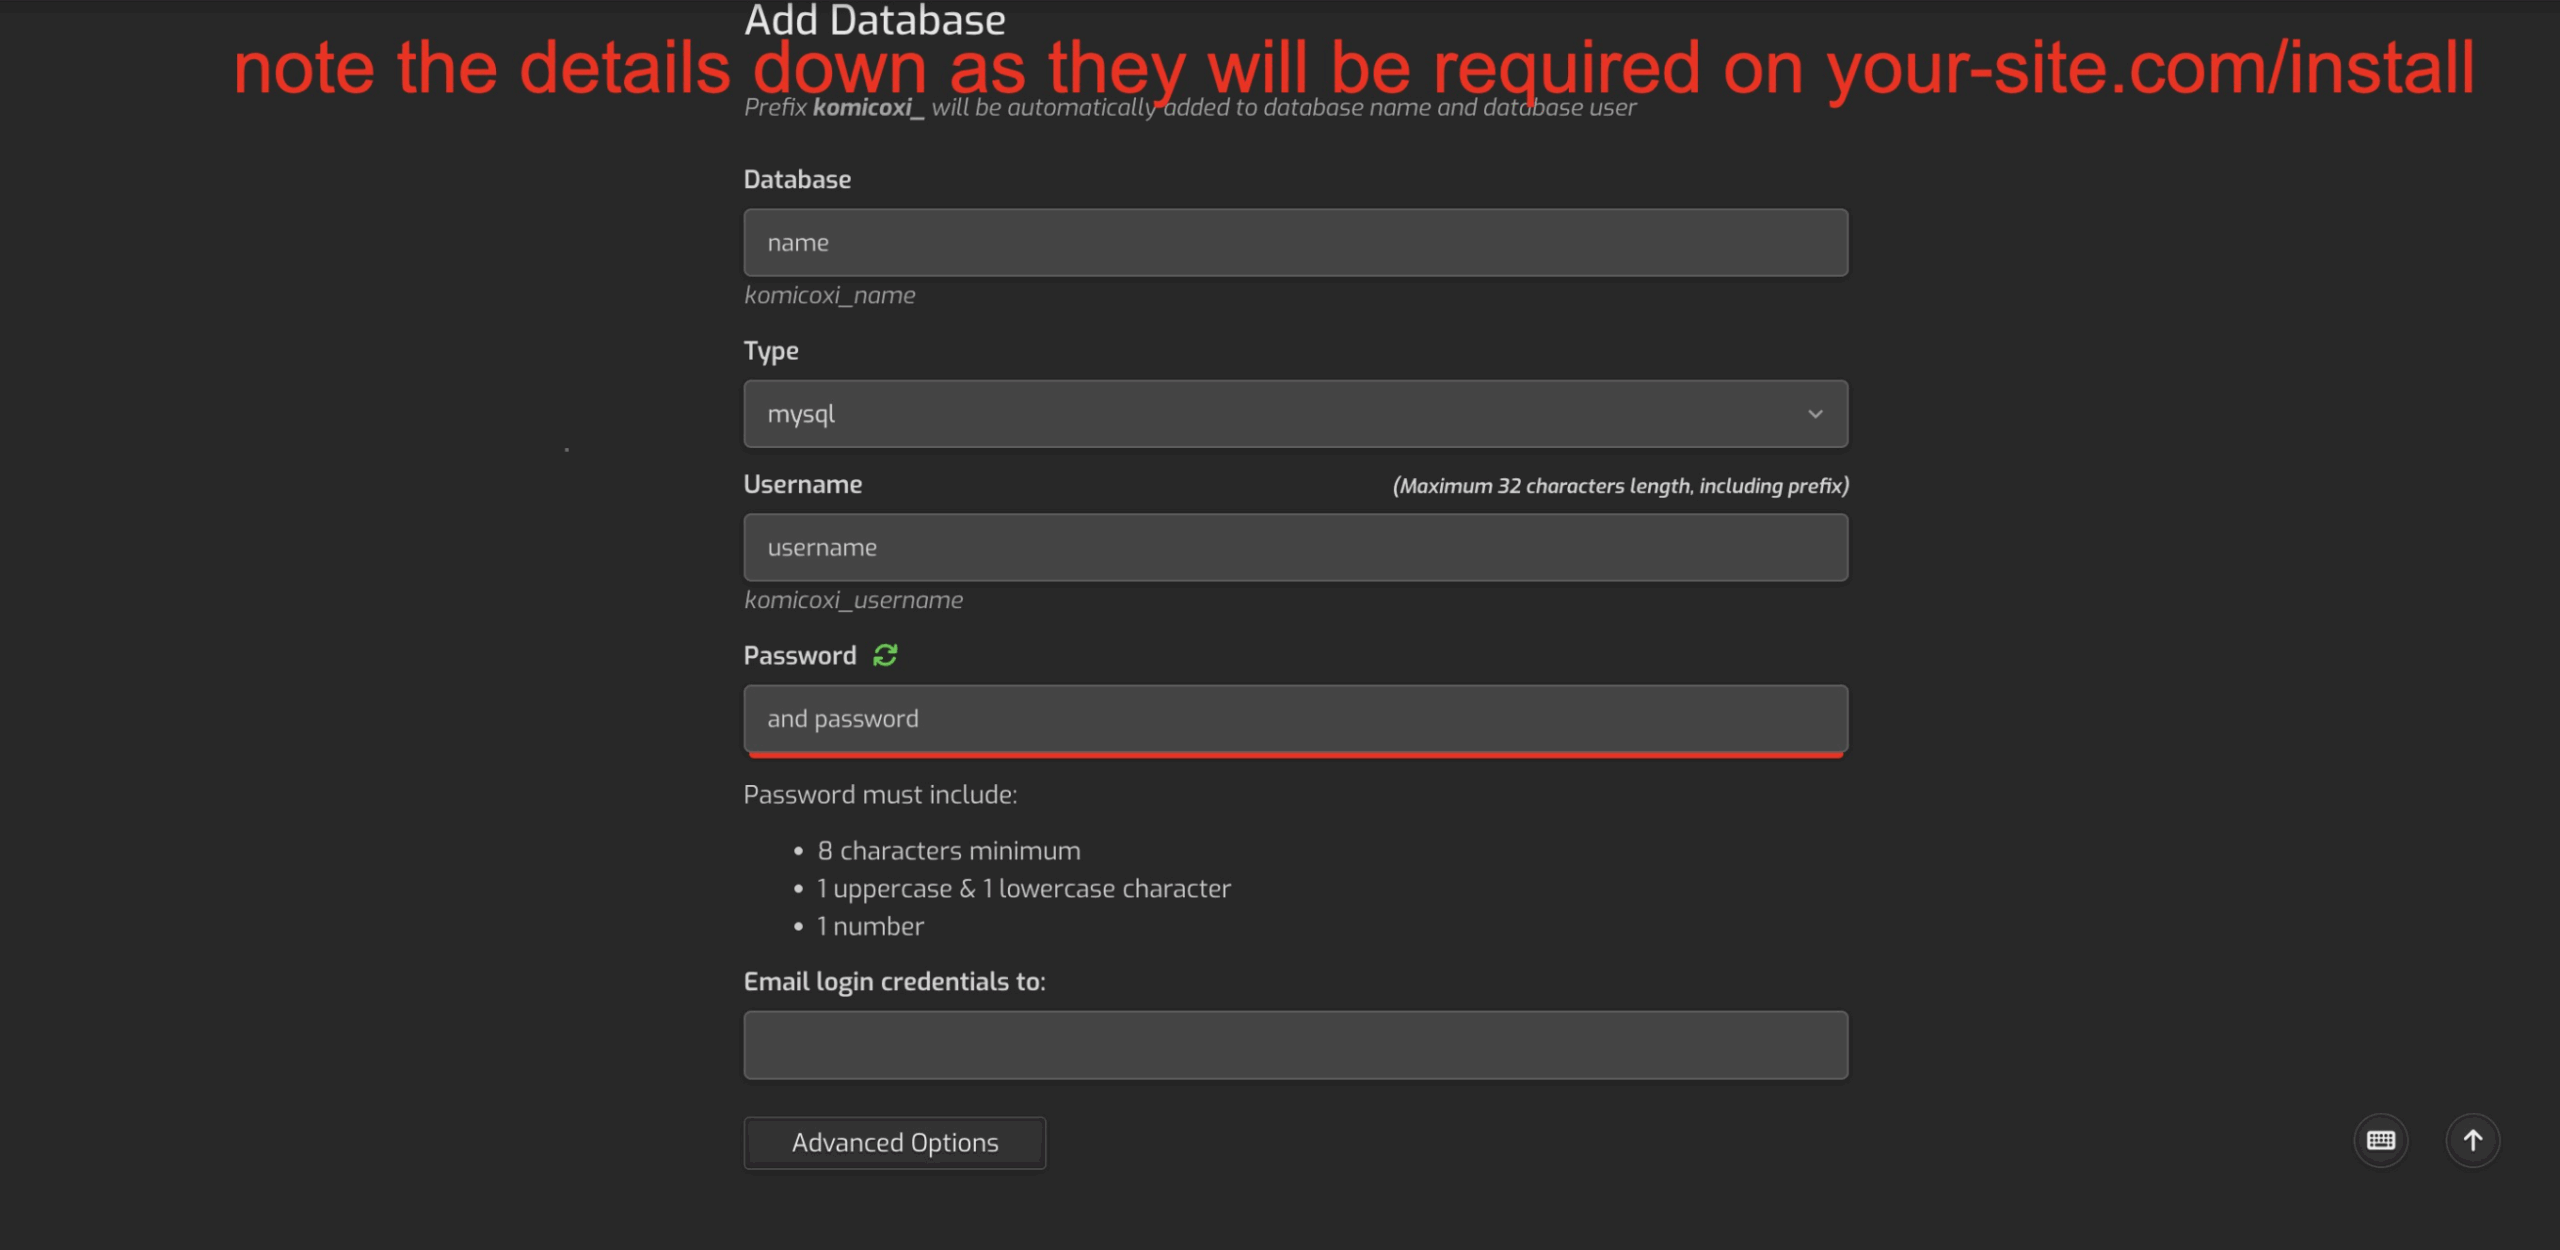
You'll need to create a MySQL database before proceeding. Most hosting providers offer this through cPanel or Plesk.
Creating a Database (cPanel)
- Log in to your cPanel
- Navigate to MySQL Databases
- Create a new database (note the database name)
- Create a new MySQL user with a strong password
- Add the user to the database with ALL PRIVILEGES
- Note down: Database Name, Database User, Database Password, and Host (usually
localhost)
Enter Database Details
Back in the CO-READIT installer, enter your database credentials:
- Database Host: Usually
localhost(check with your host if different) - Database Port: Usually
3306(default MySQL port) - Database Name: The name you created
- Database Username: The MySQL user you created
- Database Password: The password for your MySQL user
Click "Test Connection" to verify, then "Continue"
Security Note: Use a strong, unique password for your database. Never use common passwords like "password" or "123456".
4. Site & Administrator Account Setup
Configure your site information and create your administrator account:
Site Information
- Site URL: Your full website URL (e.g.,
https://yourdomain.com) - no trailing slash - Site Name: Your community's name (displayed throughout the site)
- Site Description: A brief description of your community
Administrator Account
- Admin Email: Your email address for admin notifications
- Admin Username: Your login username (alphanumeric, no spaces)
- Admin Password: A strong password (minimum 8 characters)
6. Complete Installation
- Review all settings and click "Install CO-READIT"
- The installer will:
- Import database tables and structure
- Create your administrator account
- Generate configuration files (.env)
- Set up default settings
- Create necessary directories
- Installation typically takes 30-60 seconds
- Once complete, you'll see a success message
- Important: Delete or rename
install.phpfor security
Success! Your CO-READIT installation is complete. You can now access your admin panel at https://yourdomain.com/admin
Admin Panel Configuration
Access your admin panel by navigating to https://yourdomain.com/admin and logging in with your administrator credentials.
General Settings
Navigate to Admin → Settings to configure your site's basic information:
Site Information
- Site Name: Your platform's name (displayed throughout the site)
- Site Title: Browser title and SEO
- Site Description: Meta description for search engines
- Site Keywords: SEO keywords
- Contact Email: Default contact email for users
- Support Email: Support-related inquiries email
User Registration
- User Registration: Enable/disable new user signups
- Email Verification: Require users to verify email before accessing site
- Default User Role: Role assigned to new users
SMTP Configuration
Configure email sending for notifications, verifications, and alerts:
- Navigate to Admin → Settings → Email
- Enter your SMTP credentials:
- SMTP Host: Your mail server (e.g., smtp.gmail.com)
- SMTP Port: Usually 587 (TLS) or 465 (SSL)
- SMTP Username: Your email address
- SMTP Password: Your email password or app password
- SMTP Encryption: TLS or SSL
- Click "Test Email" to verify
- Save changes
Gmail Users: Generate an App Password for your account. Go to Google Account → Security → 2-Step Verification → App passwords.
Payment Gateways
Navigate to Admin → Wallet → Gateways to set up payment processing for wallet top-ups.
Stripe Integration
- Create a Stripe account at Stripe.com
- Access your Stripe Dashboard → Developers → API Keys
- Copy your Publishable Key and Secret Key
- In CO-READIT Admin Panel:
- Paste keys in respective fields
- Choose between Test Mode or Live Mode
- Save settings
PayPal Integration
- Create a PayPal Business account at PayPal Business
- Access your PayPal Developer Dashboard
- Create a REST API application
- Copy your Client ID and Secret Key
- In CO-READIT Admin Panel:
- Paste Client ID in "PayPal Client ID"
- Paste Secret Key in "PayPal Secret Key"
- Select Mode: Sandbox (testing) or Live (production)
- Save and test a small transaction
CoinPayments (Crypto) Integration
- Create an account at CoinPayments
- Get your Merchant ID and IPN Secret
- Configure in CO-READIT admin panel
- Enable cryptocurrencies you want to accept
Bank Transfer
Configure manual bank transfer options for users who prefer traditional payment:
- Enter your bank account details
- Set up verification process
- Configure admin approval workflow
Themes & Languages
Theme Settings
Navigate to Admin → Settings → Appearance to customize your site's look:
- Default Theme: Light, Dark, or Auto (follows system preference)
- Primary Color: Main brand color (default: #00ba7b)
- Logo: Upload your platform logo (PNG format recommended)
- Favicon: Upload site favicon (32x32px ICO or PNG)
- Custom CSS: Add custom styling
- Custom JavaScript: Add custom scripts
Languages
CO-READIT includes 11 languages out of the box:
- English (en)
- Spanish (es)
- French (fr)
- German (de)
- Portuguese (pt)
- Arabic (ar) - RTL supported
- Russian (ru)
- Japanese (ja)
- Chinese (zh)
- Hindi (hi)
- Polish (pl)
Users can choose their preferred language in their settings.
Wallet System
Navigate to Admin → Wallet to manage the platform's wallet system:
Wallet Settings
- Enable Wallet: Turn user wallet system on/off
- Currency: Set your platform currency (USD, EUR, etc.)
- Currency Symbol: Display symbol ($, €, etc.)
- Minimum Deposit: Minimum amount users can add
- Minimum Withdrawal: Minimum amount for withdrawal requests
- Withdrawal Fee: Platform commission on withdrawals (%)
Withdrawal Management
View and process user withdrawal requests:
- Review pending withdrawal requests
- Approve or reject withdrawals
- View transaction history
- Credit/debit user wallets manually
Key Features Overview
CO-READIT comes packed with features to create a comprehensive community discussion experience:
Circles (Communities)
Circles are the heart of CO-READIT - themed communities where users can discuss specific topics.
- Create Circles: Users can create their own communities
- Circle Customization: Avatar, banner, description, rules
- Privacy Settings: Public, restricted, or private circles
- Circle Flairs: Custom post tags for organization
- Circle Rules: Define community guidelines
- Member Management: Invite, approve, ban members
- Moderator Roles: Assign moderators with permissions
- Favorites: Users can favorite circles for quick access
- Notifications: Toggle notifications per circle
Threads & Comments
- Create Threads: Text posts, links, images, polls
- Rich Text Editor: Markdown support for formatting
- Threaded Comments: Nested replies for discussions
- Comment Media: Attach images and files to comments
- Link Previews: Automatic preview cards for links in comments
- Voting System: Upvote/downvote threads and comments
- Karma System: Users earn karma from upvotes
- Pin Threads: Moderators can pin important posts
- Lock Threads: Prevent new comments
- Crossposting: Share threads across circles
- Save/Bookmark: Save threads for later
- Hide Threads: Users can hide unwanted content
- Report System: Report inappropriate content
Livestream & Spaces Pro
Real-time video and audio broadcasting features powered by Agora.io:
Livestreaming
Go live with video and engage your audience in real-time:
- Go Live: Start video livestreams directly from the platform with one click
- Live Chat: Real-time chat during streams with emoji reactions
- Viewer Count: Live viewer statistics displayed during stream
- Tips During Stream: Viewers can send tips to streamers from their wallet
- Schedule Streams: Announce upcoming livestreams with date/time
- Stream Reminders: Users can set reminders for scheduled streams
- Go Live Notifications: Followers get notified when you go live
- Stream Duration: Configurable max stream duration by admin
- Quality Settings: 720p/1080p video resolution options
- Stream Analytics: Peak viewers, total tips, duration stats
- Stream Reactions: Live emoji reactions from viewers
- Eligibility Requirements: Admin can set minimum karma/account age to go live
Spaces (Audio Rooms)
Host Twitter/X Spaces-style audio discussions with your community:
- Audio-Only Rooms: Low-bandwidth audio discussions for larger audiences
- Multiple Speakers: Up to 10 speakers per space simultaneously
- Speaker Requests: Listeners can raise hand to request to speak
- Host Controls: Approve/deny speaker requests, mute users, remove speakers
- Co-Hosts: Assign co-hosts to help manage the space
- Schedule Spaces: Plan audio rooms in advance with title and description
- Space Reminders: Users can subscribe to be reminded when space starts
- Listener Count: Track participation in real-time
- Tips in Spaces: Listeners can tip hosts and speakers during the session
- Space Comments: Text chat alongside audio for listeners
- Recording: Optional recording for replays (coming soon)
Session Management
Admin controls for livestream and spaces:
- Enable/Disable: Toggle livestream and spaces features globally
- Verified Only: Restrict streaming to verified users only
- Karma Requirements: Set minimum karma to go live
- Max Duration: Set maximum session duration (e.g., 4 hours)
- Concurrent Limits: Limit number of active streams/spaces
Agora Configuration
To enable Livestream & Spaces features:
- Create an account at Agora.io Console
- Create a new project and get your App ID and App Certificate
- Navigate to Admin → Settings → Sessions
- Enter your Agora App ID and App Certificate
- Configure session settings (max duration, verified-only, karma requirements)
- Save and enable sessions
Note: Agora offers 10,000 free minutes per month. For high-traffic sites, consider their paid plans.
Monetization Pro
Multiple revenue streams built into the platform for both creators and platform owners:
Creator Monetization Program
Enable content creators to earn money from their posts through an impression-based revenue system:
- Apply for Monetization: Eligible users can apply to join the program from their settings
- Eligibility Requirements: Admin sets minimum karma, account age, and post count to qualify
- Impression-Based Earnings: Creators earn based on unique post views
- Configurable Rates: Admin sets earning rate per 1,000 impressions (CPM)
- Earnings Dashboard: Track impressions, clicks, and earnings in real-time
- Earnings Chart: Visual chart showing earnings over time (daily/weekly/monthly)
- Automatic Payouts: Earnings credited to user wallet automatically
- Minimum Payout: Set minimum balance threshold for withdrawal requests
- Application Review: Admin approves/rejects monetization applications
- Monetization Badge: Monetized creators get a special badge on their profile
How Creator Earnings Work: When a monetized user's post receives views, they earn a portion of the platform's ad revenue. For example, if the CPM rate is $2.00, a post with 10,000 views earns the creator $20.00 (credited to their wallet).
Wallet System
A complete digital wallet system for all financial transactions:
- User Wallets: Each user has a platform wallet with balance
- Multiple Payment Methods: Stripe, PayPal, CoinPayments, Bank Transfer
- Deposit & Withdraw: Users can add funds and withdraw earnings
- Transaction History: Complete audit trail of all transactions
- Admin Controls: Credit/debit wallets, approve withdrawals manually
- Currency Support: Configure platform currency (USD, EUR, GBP, etc.)
- Withdrawal Fees: Optional platform commission on withdrawals
Tipping System
Allow users to tip creators directly for quality content:
- Tip Posts: Send tips on threads and comments with one click
- Tip During Streams: Support livestreamers and space hosts in real-time
- Tip Animations: Visual effects and notifications for tips
- Quick Tip Amounts: Preset tip amounts for fast tipping
- Custom Amounts: Users can enter custom tip amounts
- Configurable Limits: Set min/max tip amounts
- Platform Fee: Optional platform commission on tips (configurable %)
- Tip Notifications: Recipients get notified of tips received
Awards & Coins
Gamified awards system similar to Reddit Gold/Platinum:
- Purchasable Awards: Users buy awards with wallet balance
- Award Tiers: Multiple award types at different price points
- Creator Revenue: Award recipients earn coins from awards received
- Award Display: Awards shown on threads/comments
- Award Leaderboards: Top award givers and receivers
- Custom Awards: Admin can create custom award types
Promoted Content
Self-serve advertising system for users to promote their posts:
- Thread Promotion: Users pay to promote their posts to wider audience
- Circle Targeting: Target specific communities for relevant exposure
- Budget Control: Set daily and total budget limits
- Duration Settings: Choose promotion duration (1 day to 30 days)
- Analytics: Track impressions, clicks, and engagement
- Admin Pricing: Set promotion rates per 1,000 impressions
- Admin Approval: Optionally require admin approval for promotions
- Promoted Label: Clear "Promoted" label on promoted content
Revenue Sharing
Configure how revenue is distributed:
- Platform Fee: Set platform commission percentage on all transactions
- Creator Split: Configure creator's share of ad revenue
- Withdrawal Minimums: Set minimum withdrawal amounts
- Payment Processing: Automatic or manual withdrawal processing
Moderation Tools
Comprehensive tools for circle and site-wide moderation:
Circle Moderation
- Mod Queue: Review reported content
- Mod Log: Track all moderation actions
- Mod Mail: Private communication with moderators
- Ban Management: Temporary or permanent bans
- Content Removal: Remove threads/comments
- User Warnings: Issue warnings before bans
AutoModerator New
- Rule-based Automation: Create auto-moderation rules
- Keyword Filtering: Auto-remove posts with banned words
- Spam Detection: Auto-flag suspicious content
- Account Age Rules: Restrict new account posting
- Karma Requirements: Minimum karma to post
- Action Logs: Track AutoMod actions
Site Moderators
- Site-wide Moderation: Moderate across all circles
- Global Queue: All reported content in one place
- User History: View user's moderation history
Awards & Badges
Gamification features to increase engagement:
- Awards: Users can give awards to threads/comments
- Purchasable Awards: Buy awards with wallet coins
- Award Hub: View all available awards
- Leaderboards: Top award givers/receivers
- Badges: Achievement badges for users
- Badge Display: Show badges on profile
Messaging System
- Direct Messages: Private user-to-user messaging
- Conversation Threads: Chat-style conversations
- Unread Counts: Track unread messages
- Delete Conversations: Delete conversations from your inbox
- Archive: Archive old conversations
- Mute: Mute conversation notifications
- Block Users: Block unwanted contacts
- Search: Search through messages
- Message Notifications: Real-time notification for new messages
Promotions & Advertising
- Promoted Threads: Users can promote their posts
- Targeting Options: Target specific circles
- Budget Control: Set daily/total budgets
- Analytics: View impressions, clicks, engagement
- Admin Approval: Review promotions before going live
- Pricing Control: Admin sets promotion pricing
AI Features - Ogini AI Pro
Integrated AI assistant powered by Ogini AI for enhanced user experience:
AI Chat Assistant
- Built-in AI Chat: Users can chat with AI directly from the platform
- Context-Aware: AI understands the current page/thread context
- Smart Replies: AI-suggested reply options for comments
- Post Summarization: AI summarizes long threads and discussions
- Writing Assistance: Help users compose better posts
@Ogini Comment Replies
Users can mention @ogini in any comment to get an AI-powered reply:
- Natural Interaction: Simply type @ogini followed by your question in any comment
- Context-Aware Responses: AI reads the thread and provides relevant answers
- Discussion Helper: Get AI insights, explanations, or fact-checks
- Rate Limited: Configurable per-user rate limits to prevent abuse
- Admin Control: Enable/disable @ogini mentions globally or per circle
@Username AI Agent Replies New
Users can mention any user with @username in comments to summon an AI agent that responds in that user's style:
- User Selection: Mention any registered user by typing @username in your comment
- AI Persona: The AI generates a response mimicking that user's style based on their post history
- Fun Interactions: Ask questions as if you're talking to that user
- Context-Aware: AI considers the thread context and the mentioned user's typical responses
- Rate Limited: Per-user limits prevent abuse of this feature
- Privacy Respecting: Users can opt-out of being AI-mentionable in their settings
Example: Commenting @john_doe what do you think about this? will trigger an AI response that mimics how john_doe typically responds based on their posting history.
Trending Topics AI Summary
AI-powered 24-hour trending summary feature:
- Automatic Extraction: Keywords automatically extracted from thread titles
- Smart Ranking: Topics ranked by engagement score and post count
- Sidebar Widget: Trending keywords displayed on homepage sidebar
- Click to Search: Click any trending topic to see related posts
- Daily Refresh: Topics updated based on recent activity
AI Thread Overview
- Thread Summary: AI generates concise summaries of long discussions
- Key Points: Highlights the main arguments and conclusions
- Sentiment Analysis: Shows overall sentiment of the discussion
- TL;DR Button: Users can request AI summary with one click
Ogini AI Configuration
To enable AI features:
- Get your API key from Ogini AI
- Navigate to Admin → Settings → AI
- Enter your Ogini API Key
- Configure AI settings (enable/disable features, set usage limits)
- Configure rate limits for @ogini mentions
- Save settings
Alternative Providers: CO-READIT also supports OpenAI and Anthropic APIs. Configure your preferred provider in the AI settings.
Trending & Discovery
Help users discover popular content and communities:
Trending Keywords
- Automatic Extraction: Keywords extracted from post titles using AI
- Smart Filtering: Stopwords and common words filtered out
- Engagement Scoring: Topics ranked by votes and comments
- Sidebar Widget: Top 5 trending topics on homepage
- 24-Hour Window: Shows what's trending in the last 24 hours
- Click to Search: Clicking a topic searches related posts
Trending Circles
- Popular Communities: Circles with most recent activity
- Subscriber Growth: Fast-growing communities highlighted
- Sidebar Discovery: Suggested circles on homepage
Hot & Top Posts
- Hot Algorithm: Combines recency with engagement
- Top Posts: Filter by today, week, month, year, all time
- Rising Posts: New posts gaining traction
Additional Features
- User Profiles: Customizable with avatar, banner, bio
- User Verification: Admin can verify notable users with a checkmark badge
- Circle Verification: Verified badge for official/notable circles
- Follow System: Follow other users
- Trending Keywords: AI-extracted trending topics from recent posts displayed on sidebar
- Trending Circles: Discover popular communities
- Search: Full-text search across content
- Notifications: Real-time notification system
- Analytics: User and circle analytics
- Media Uploads: Image support with thumbnails
- SEO Optimized: Meta tags, sitemaps
- PWA Ready: Progressive Web App support
- Multi-language: 11 languages included with easy translation
- Dark Mode: Full dark theme support
Third-Party Integrations
Payment Processing
Stripe
Navigate to Admin → Wallet → Gateways → Stripe
- Get API keys from Stripe Dashboard
- Supports credit cards, digital wallets (Apple Pay, Google Pay)
- Built-in fraud protection
- Webhook support for payment confirmations
PayPal
Navigate to Admin → Wallet → Gateways → PayPal
- Get credentials from PayPal Developer
- Supports both Sandbox (testing) and Live modes
- Express checkout integration
CoinPayments
Navigate to Admin → Wallet → Gateways → CoinPayments
- Accept Bitcoin, Ethereum, and 100+ cryptocurrencies
- Automatic currency conversion
- IPN webhooks for confirmations
Cloud Storage Integration
Offload media storage to cloud services for better performance and scalability.
Amazon S3
Navigate to Admin → Settings → Storage
- Create an AWS account at AWS
- Create an S3 bucket in your preferred region
- Create IAM user with S3 permissions
- Generate Access Key ID and Secret Access Key
- Enter credentials in CO-READIT admin panel
- Enable S3 storage
Other S3-Compatible Services
- Wasabi: 80% cheaper than AWS S3
- DigitalOcean Spaces: Simple developer-friendly storage
- Backblaze B2: Cost-effective cloud storage
Email Services
SMTP Configuration
Configure any SMTP service:
- Gmail (with App Password)
- SendGrid
- Mailgun
- Amazon SES
- Postmark
- Your hosting provider's SMTP
Social Authentication
Navigate to Admin → Settings → OAuth to enable social login:
Google Login
- Go to Google Cloud Console
- Create a new project
- Enable Google Sign-In API
- Create OAuth 2.0 credentials
- Add authorized redirect URI:
https://yourdomain.com/api/v1/auth/google - Copy Client ID and Client Secret to CO-READIT
Other Integrations
Google reCAPTCHA
Prevent spam and bot registrations:
- Get keys from Google reCAPTCHA
- Choose reCAPTCHA v2
- Add your domain
- Copy Site Key and Secret Key to CO-READIT settings
Troubleshooting Common Issues
Debug Mode & Log Files
CO-READIT includes a comprehensive debug system to help troubleshoot issues. Debug mode is disabled by default for security and performance reasons.
Enabling Debug Mode
To enable debug logging, edit your .env file in the root directory:
- Open
.envfile using FTP/SFTP or cPanel File Manager - Find the line:
APP_DEBUG=false - Change it to:
APP_DEBUG=true - Save the file
# Enable debug mode (set to false in production)
APP_DEBUG=true
Security Warning: Never leave debug mode enabled in production! Debug mode exposes detailed error messages and logs sensitive information. Only enable it temporarily for troubleshooting, then disable it immediately.
Log File Locations
When debug mode is enabled, log files are stored in the storage/logs/ directory:
| Log File | Description |
|---|---|
storage/logs/error.log |
General application errors and exceptions |
storage/logs/debug.log |
Debug messages and trace information |
storage/logs/webhooks.log |
Payment webhook events (Stripe, PayPal) |
storage/logs/stripe.log |
Stripe payment gateway logs |
storage/logs/paypal.log |
PayPal payment gateway logs |
storage/logs/coinpayments.log |
CoinPayments cryptocurrency logs |
storage/logs/backup.log |
Database backup operation logs |
Viewing Log Files
To view log files:
- Via FTP/SFTP: Navigate to
storage/logs/and download the relevant log file - Via cPanel: Use File Manager to browse to
storage/logs/ - Via SSH: Run
tail -f storage/logs/error.logto watch logs in real-time
Disabling Debug Mode
After troubleshooting, always disable debug mode:
- Edit
.envfile - Set
APP_DEBUG=false - Save the file
- Optionally, clear log files: delete contents of
storage/logs/*.log
Note: When debug mode is disabled (APP_DEBUG=false), no log files are written. This is the recommended setting for production environments.
Installation Problems
Database Connection Failed
Error: "Database connection failed" or "Access denied for user"
Solutions:
- Verify database credentials are correct
- Ensure database user has ALL PRIVILEGES on the database
- Check if database host is correct (try
localhostor127.0.0.1) - Verify the database name is correct (case-sensitive on some servers)
- Contact your hosting provider to verify MySQL service is running
White Screen After Installation
Solutions:
- Check PHP error logs in
storage/logs/directory - Ensure all files were uploaded completely
- Verify file permissions on
storage/directories - Clear browser cache and cookies
- Check if
.htaccessfile exists in root directory
500 Internal Server Error
Solutions:
- Check Apache/Nginx error logs
- Verify
.htaccesssyntax (Apache only) - Check PHP version meets minimum requirement (8.1+)
- Ensure mod_rewrite is enabled (Apache)
- Check file permissions aren't too restrictive
Performance Issues
Slow Page Loading
Solutions:
- Enable cloud storage (S3, Wasabi) to offload media
- Increase PHP memory limit to 256MB or higher
- Enable OPcache for PHP
- Use a CDN for static assets
- Optimize database with periodic maintenance
Media Upload Failures
Solutions:
- Check
storage/uploads/directory is writable - Increase PHP
upload_max_filesizeandpost_max_size - Increase
max_execution_timefor large files - Verify GD extension is installed for image processing
- Check available disk space on server
Email & Notification Issues
Emails Not Sending
Solutions:
- Test email in admin panel settings
- Verify SMTP credentials are correct
- Check SMTP port (587 for TLS, 465 for SSL)
- For Gmail, use App Password instead of regular password
- Check if emails are in spam folder
- Verify sender email domain has proper SPF/DKIM records
Payment Issues
Payments Not Processing
Solutions:
- Verify payment gateway API keys are correct
- Check if using Test/Sandbox keys in production (or vice versa)
- Ensure webhook URLs are configured correctly
- Check payment gateway dashboard for error logs
- Verify SSL certificate is valid (required for payments)
Security Issues
Forgot Admin Password
Solution:
- Access your database via phpMyAdmin
- Navigate to
userstable - Find your admin user record
- Generate a new password hash using:
password_hash('yournewpassword', PASSWORD_BCRYPT) - Update the password field with the new hash
- Log in with your new password
Security Warning: Change the password immediately after regaining access!
Support & Updates
Getting Support
Need Help?
If you encounter any issues or have questions about CO-READIT:
- Check this documentation first - most questions are answered here
- Visit our support portal: https://edubrazeal.com
- Create a support ticket with:
- Detailed description of the issue
- Screenshots if applicable
- Error messages from logs
- Steps to reproduce the problem
- Response time: Usually within 24-48 hours
Email: chinedu@edubrazeal.com
Website: https://edubrazeal.com
Updates & Changelog
CO-READIT receives regular updates with new features, bug fixes, and security patches.
Checking for Updates
- Log in to admin panel
- Navigate to Admin → Settings
- Check current version displayed
- Visit edubrazeal.com to check for newer versions
Installing Updates
Important: Always backup your database and files before updating!
- Create a full backup (Admin → Backups)
- Download the latest version from edubrazeal.com
- Upload new files (exclude .env file and storage/ folder)
- Run any included migration scripts
- Clear cache if needed
- Test your site thoroughly after updating
Best Practices
- ✅ Keep CO-READIT updated to the latest version
- ✅ Regular automated backups (daily or weekly)
- ✅ Use strong passwords for admin accounts
- ✅ Enable reCAPTCHA to prevent spam
- ✅ Monitor server resources and scale as needed
- ✅ Use HTTPS/SSL for security and trust
- ✅ Configure proper file permissions
- ✅ Review and moderate reported content regularly
- ✅ Set up AutoModerator rules for automated moderation
- ✅ Test payment systems in sandbox mode first
Server Optimization Tips
- Use PHP 8.2+ for better performance
- Enable OPcache for PHP
- Use Redis or Memcached for caching
- Offload media to cloud storage (S3, Wasabi)
- Use a CDN for static assets
- Enable gzip compression
- Optimize MySQL/MariaDB configuration
- Use HTTP/2 for faster page loads
Community & Resources
- Demo: https://co-readit.edubrazeal.com
- Author Website: https://edubrazeal.com
- Purchase: CO-READIT on edubrazeal.com
- Documentation: This file (keep it handy!)