Komico Documentation
Welcome to Komico! Thank you for purchasing our advanced social networking platform. This comprehensive guide will walk you through the installation, configuration, and management of your Komico social network.
Komico is a feature-rich social platform that allows you to create a vibrant, interactive community with user profiles, dynamic feeds, direct messaging, stories, live streaming capabilities, a complete wallet and monetization system, content subscriptions, advertisements, and much more.
Important: Please read this documentation thoroughly before installation. Keep this document handy as a reference throughout your setup process.
Server Requirements
Before installing Komico, ensure your server meets the following requirements:
Minimum Requirements
| Component | Requirement | Notes |
|---|---|---|
| PHP Version | 7.4 or higher | PHP 8.0+ recommended for better performance |
| MySQL | 5.7 or higher | MariaDB 10.2+ also supported |
| Web Server | Apache 2.4+ or Nginx 1.18+ | URL rewriting must be enabled |
| Memory Limit | 128MB minimum | 256MB+ recommended |
| Max Upload Size | 20MB minimum | 64MB+ recommended for media uploads |
| Max Execution Time | 300 seconds | Required for installation and backups |
| Disk Space | 500MB minimum | More space needed for user media |
Required PHP Extensions
mysqli- Database connectivity (critical)mbstring- Multi-byte string support (critical)gd- Image processingcurl- External API requestszip- Backup functionalityfileinfo- File type detectionjson- JSON data handling (critical)openssl- Secure connections
Directory Permissions
The following directories must be writable (chmod 755 or 775):
upload/- User uploaded mediacore/- System configuration filesthemes/- Theme customizationsite_backups/- System backups
Tip: The Komico installer will automatically check all requirements and provide detailed feedback on any missing components.
Installation & Setup
Follow these steps carefully to install Komico on your server.
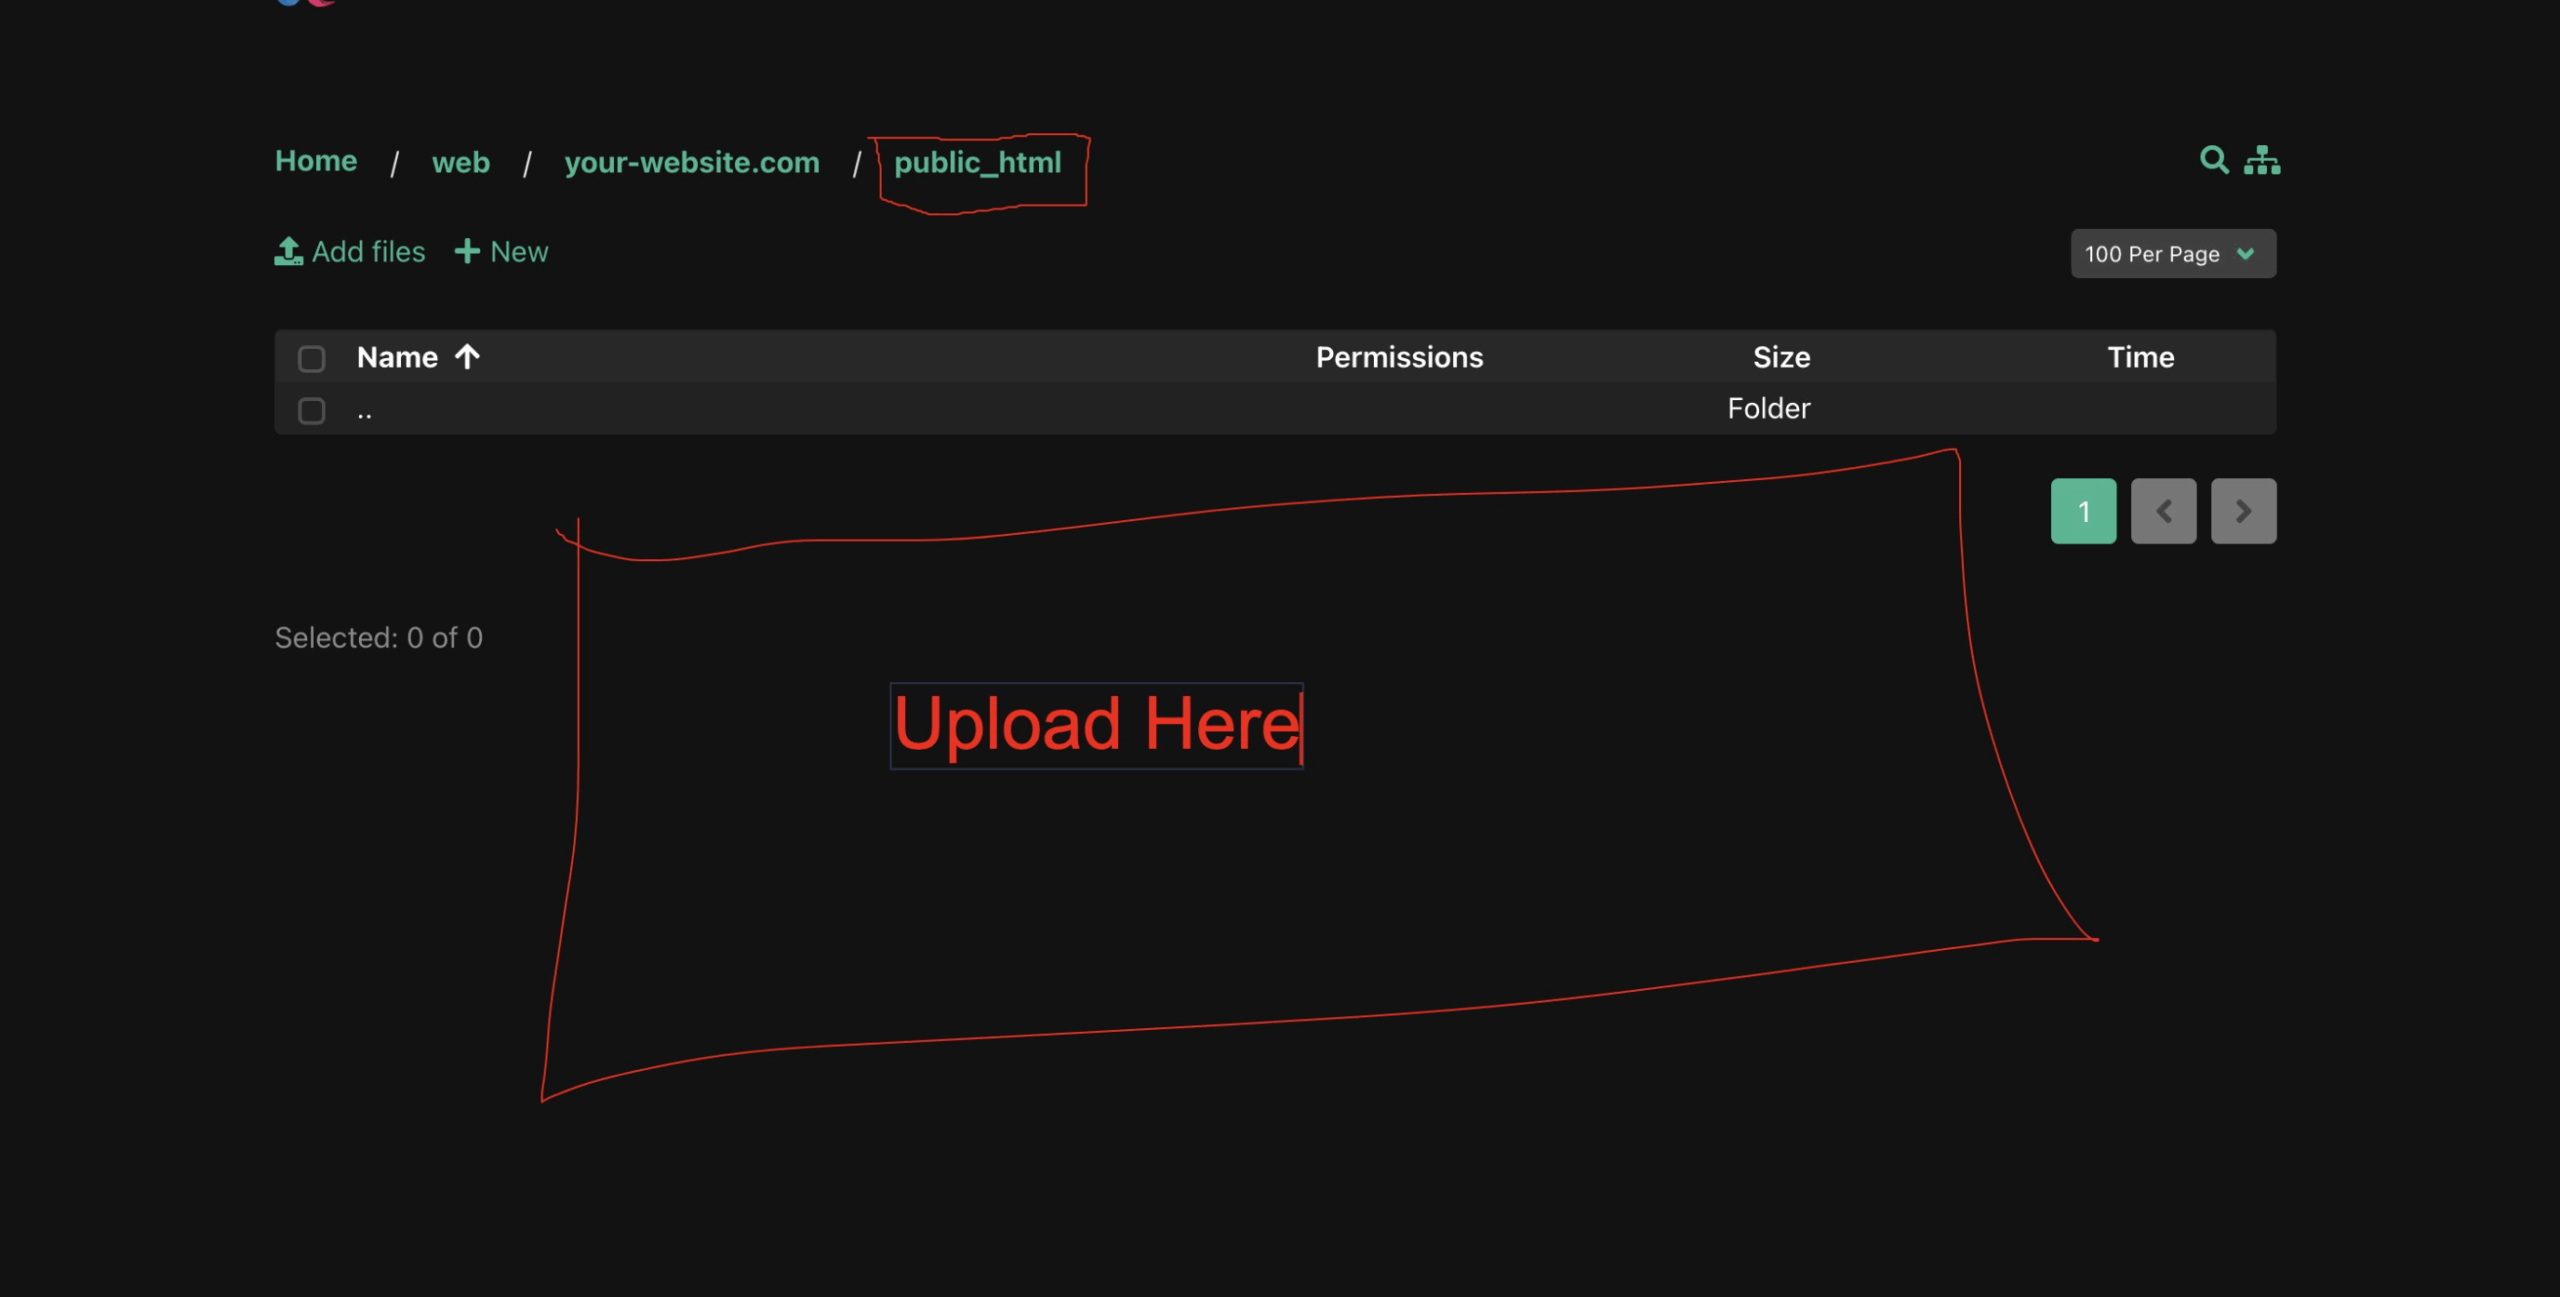
1. Upload Files to Server
- Extract the Komico package you downloaded to your local computer
- Connect to your server via FTP/SFTP using FileZilla, WinSCP, or cPanel File Manager
- Navigate to your website's root directory (usually
public_htmlorwww) - Upload all extracted files to this directory
- Wait for all files to upload completely (this may take several minutes)
Important: Make sure to upload all files including hidden files like .htaccess
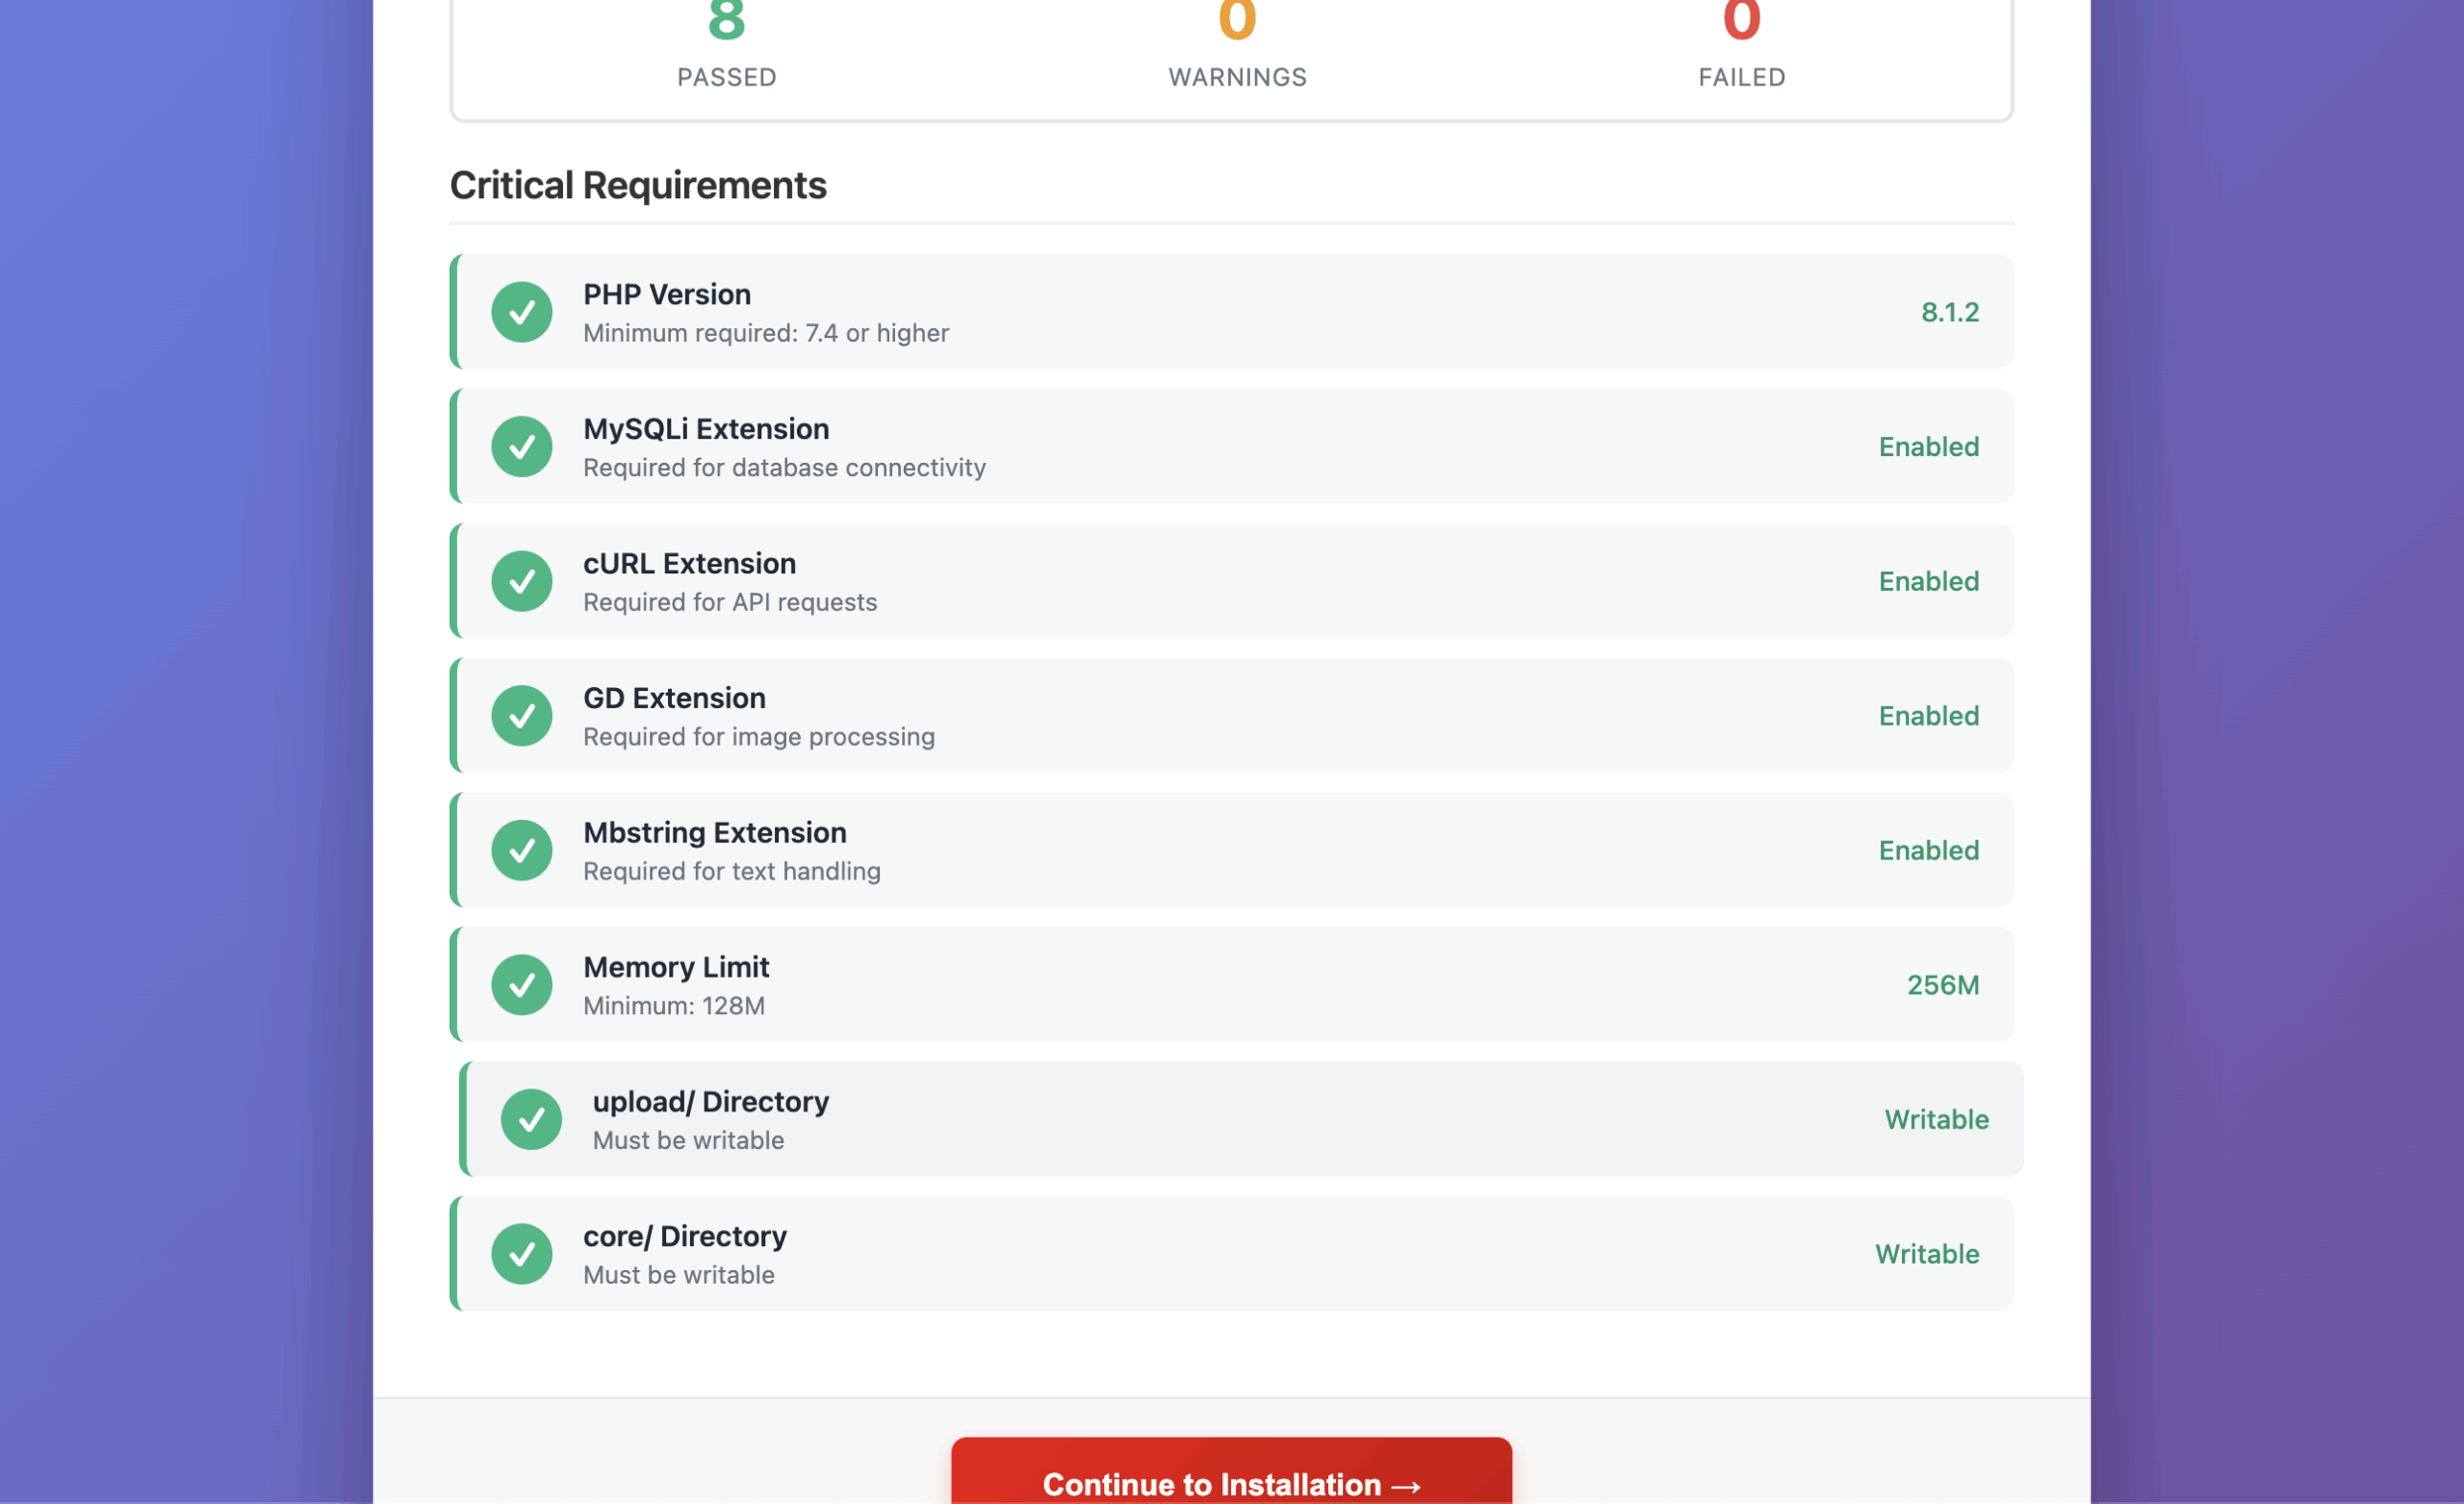
2. Run the Installation Wizard
- Open your web browser and navigate to:
https://yourdomain.com/install.php - The installer will perform an automatic server requirements check
- Review all requirements - critical items must pass (green checkmarks)
- If any critical requirement fails, contact your hosting provider
- Once all checks pass, click "Continue to Installation"
3. Database Configuration
You'll need to create a MySQL database before proceeding. Most hosting providers offer this through cPanel or Plesk.
Creating a Database (cPanel)
- Log in to your cPanel
- Navigate to MySQL Databases
- Create a new database (note the database name)
- Create a new MySQL user with a strong password
- Add the user to the database with ALL PRIVILEGES
- Note down: Database Name, Database User, Database Password, and Host (usually
localhost)
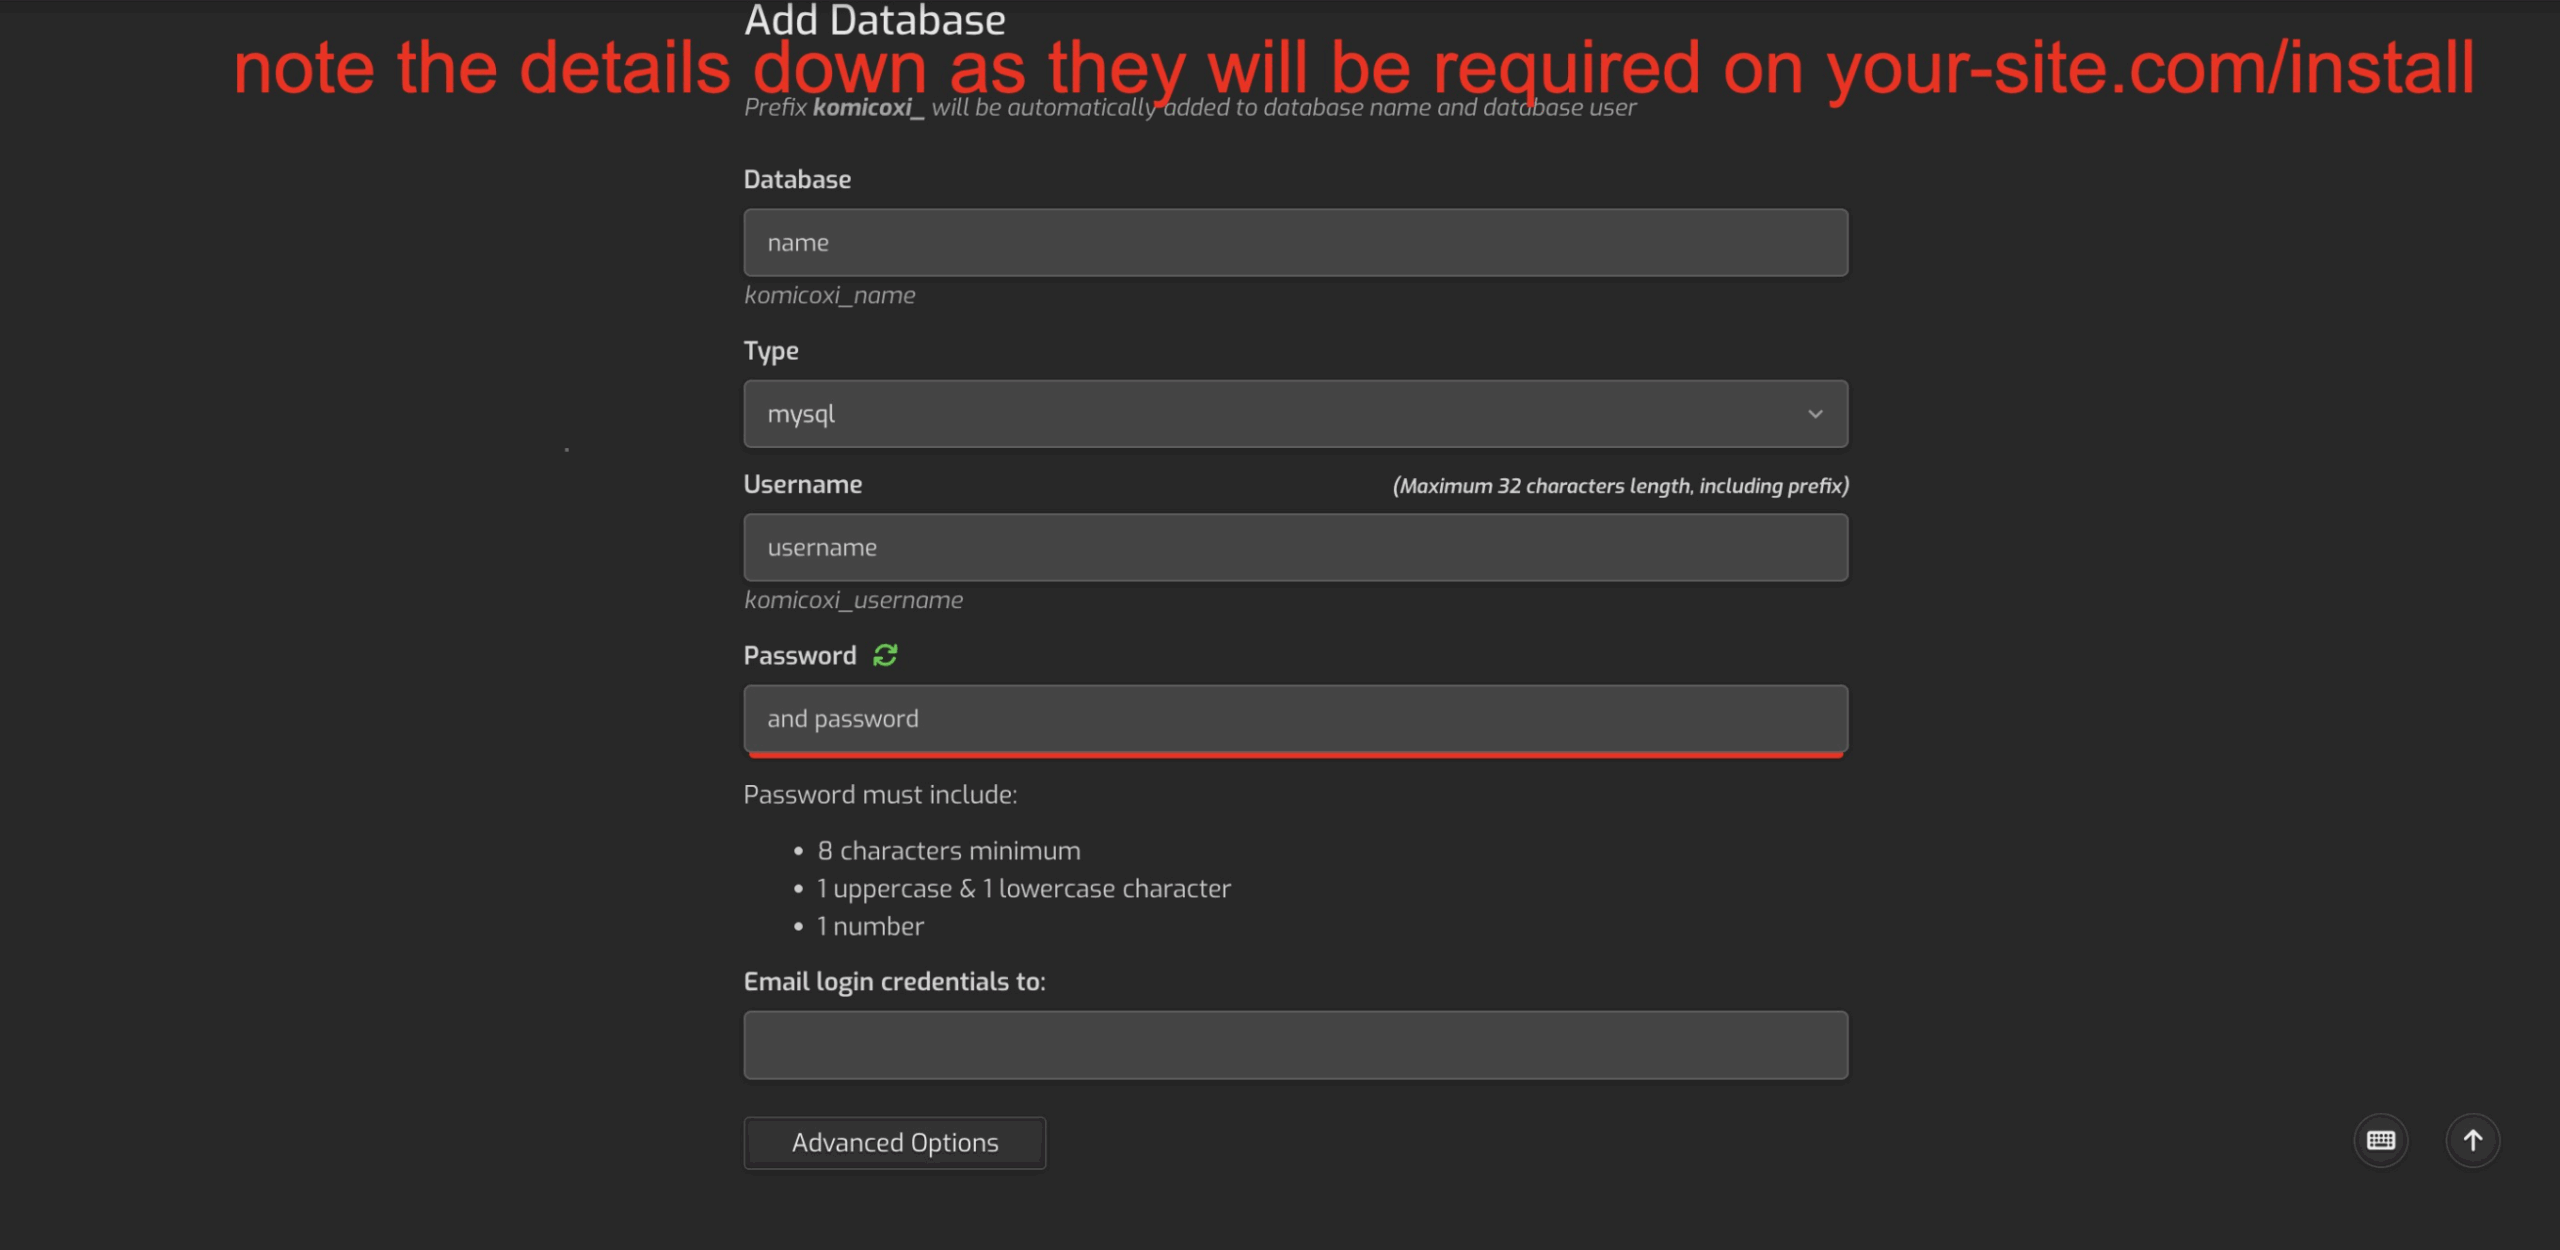
Enter Database Details
Back in the Komico installer, enter your database credentials:
- Database Host: Usually
localhost(check with your host if different) - Database Name: The name you created
- Database Username: The MySQL user you created
- Database Password: The password for your MySQL user
Click "Test Connection" to verify, then "Continue"
Security Note: Use a strong, unique password for your database. Never use common passwords like "password" or "123456".
4. Administrator Account Setup
Create your administrator account with the following information:
- Site URL: Your full website URL (e.g.,
https://yourdomain.com) - no trailing slash - Admin Email: Your email address for admin notifications
- Admin Username: Your login username (alphanumeric, no spaces)
- Admin Password: A strong password (minimum 8 characters)
- First Name: Your first name
- Last Name: Your last name
5. Complete Installation
- Review all settings and click "Install Komico"
- The installer will:
- Import database tables and structure
- Create your administrator account
- Generate configuration files
- Set up default settings
- Installation typically takes 30-60 seconds
- Once complete, you'll see a success message
- Important: Delete or rename
install.phpfor security
Success! Your Komico installation is complete. You can now access your admin panel at https://yourdomain.com/admin_panel
Admin Panel Configuration
Access your admin panel by navigating to https://yourdomain.com/admin_panel and logging in with your administrator credentials.
General Settings
Navigate to System → General Settings to configure your site's basic information:
Site Information
- Site Name: Your platform's name (displayed throughout the site)
- Site Title: Browser title and SEO
- Site Description: Meta description for search engines
- Site Keywords: SEO keywords
- Site Email: Default sender email for system notifications
User Registration
- User Registration: Enable/disable new user signups
- Email Verification: Require users to verify email before accessing site
- Phone Verification: Require phone number verification (requires SMS API)
- Age Restriction: Minimum age requirement for registration
SMTP Configuration
Configure email sending for notifications, verifications, and alerts:
- Navigate to System → Email Settings
- Enter your SMTP credentials:
- SMTP Host: Your mail server (e.g., smtp.gmail.com)
- SMTP Port: Usually 587 (TLS) or 465 (SSL)
- SMTP Username: Your email address
- SMTP Password: Your email password or app password
- SMTP Encryption: TLS or SSL
- Click "Test SMTP Connection" to verify
- Save changes
Gmail Users: Enable "Less secure app access" or generate an App Password for your account. Standard password may not work due to Google security.
Payment Gateways
Navigate to Monetization → Payment Gateways to set up payment processing for wallet top-ups.
PayPal Integration
- Create a PayPal Business account at PayPal Business
- Access your PayPal Developer Dashboard
- Create a REST API application
- Copy your Client ID (Public Key) and Secret Key
- In Komico Admin Panel:
- Paste Client ID in "PayPal API Public Key"
- Paste Secret Key in "PayPal API Secret Key"
- Select Mode: Sandbox (testing) or Live (production)
- Save and test a small transaction
Stripe Integration
- Create a Stripe account at Stripe.com
- Access your Stripe Dashboard → Developers → API Keys
- Copy your Publishable Key and Secret Key
- In Komico Admin Panel:
- Paste keys in respective fields
- Choose between Test Mode or Live Mode
- Save settings
Razorpay Integration (India)
- Sign up at Razorpay
- Get your API Key ID and Key Secret from Dashboard
- Enter credentials in Komico admin panel
- Configure webhook URL for payment confirmations
Push Notifications
Navigate to System → Push Notifications to configure real-time notifications for your users.
OneSignal Setup
OneSignal provides free push notifications for web browsers:
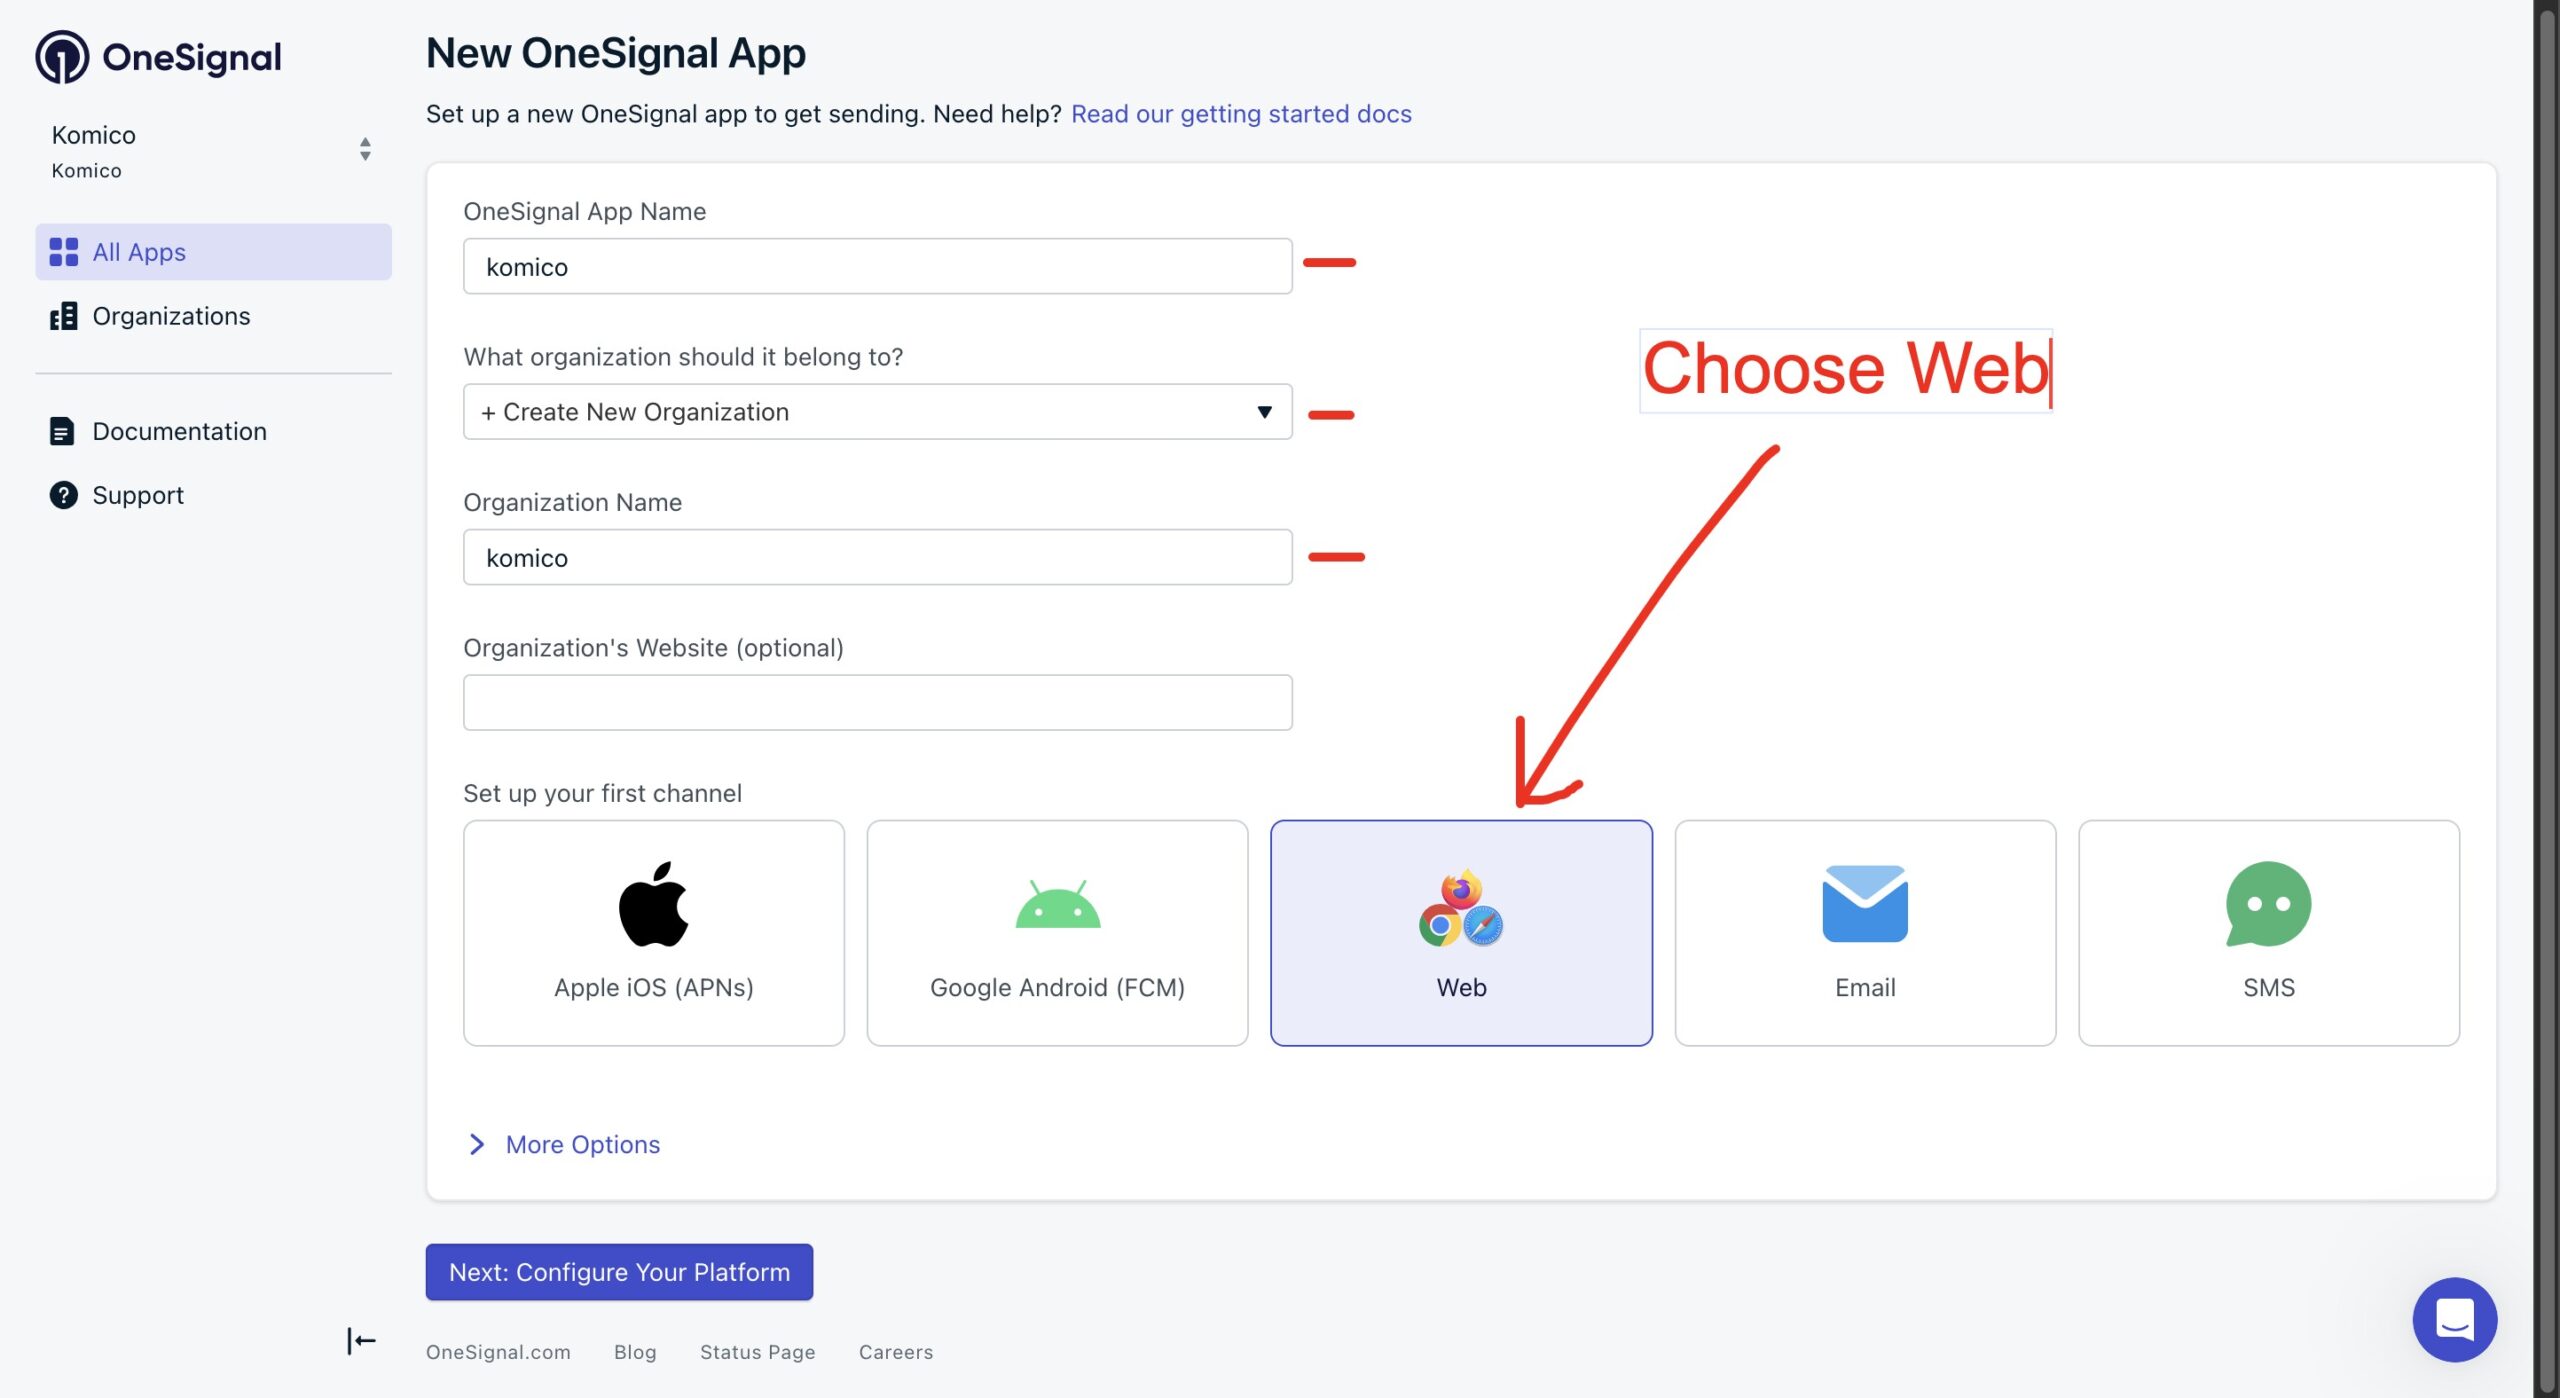
- Create a free account at OneSignal.com
- Create a new app for your website
- Choose "Web Push" as platform
- Follow OneSignal's setup wizard:
- Enter your site URL
- Upload default notification icon (256x256px)
- Configure permission prompts
- From OneSignal Dashboard, copy:
- App ID
- REST API Key (found in Settings → Keys & IDs)
- In Komico Admin Panel:
- Select "OneSignal" as notification provider
- Paste App ID and REST API Key
- Enable push notifications
- Save and test notifications
Komico Mobile App Notifications
For Android and iOS mobile apps with push notifications:
Mobile Apps Available Separately: Android and iOS mobile applications for Komico are sold separately. These apps come with full push notification support and app store deployment assistance.
To purchase mobile apps: Visit https://edubrazeal.com and create a support ticket requesting mobile app information.
If you have purchased the mobile apps:
- In Admin Panel, select "Komico" as notification provider
- Contact the developer at edubrazeal.com for your unique API keys
- Enter the provided keys:
- Komico App Key (Android)
- Komico API Key (Android)
- Komico App Key (iOS)
- Komico API Key (iOS)
- Save settings to activate mobile push notifications
Themes & Languages
Display Settings
Navigate to Themes → Display Settings to customize your site's appearance:
- Color Scheme: Choose between Light, Dark, or Auto (system-based)
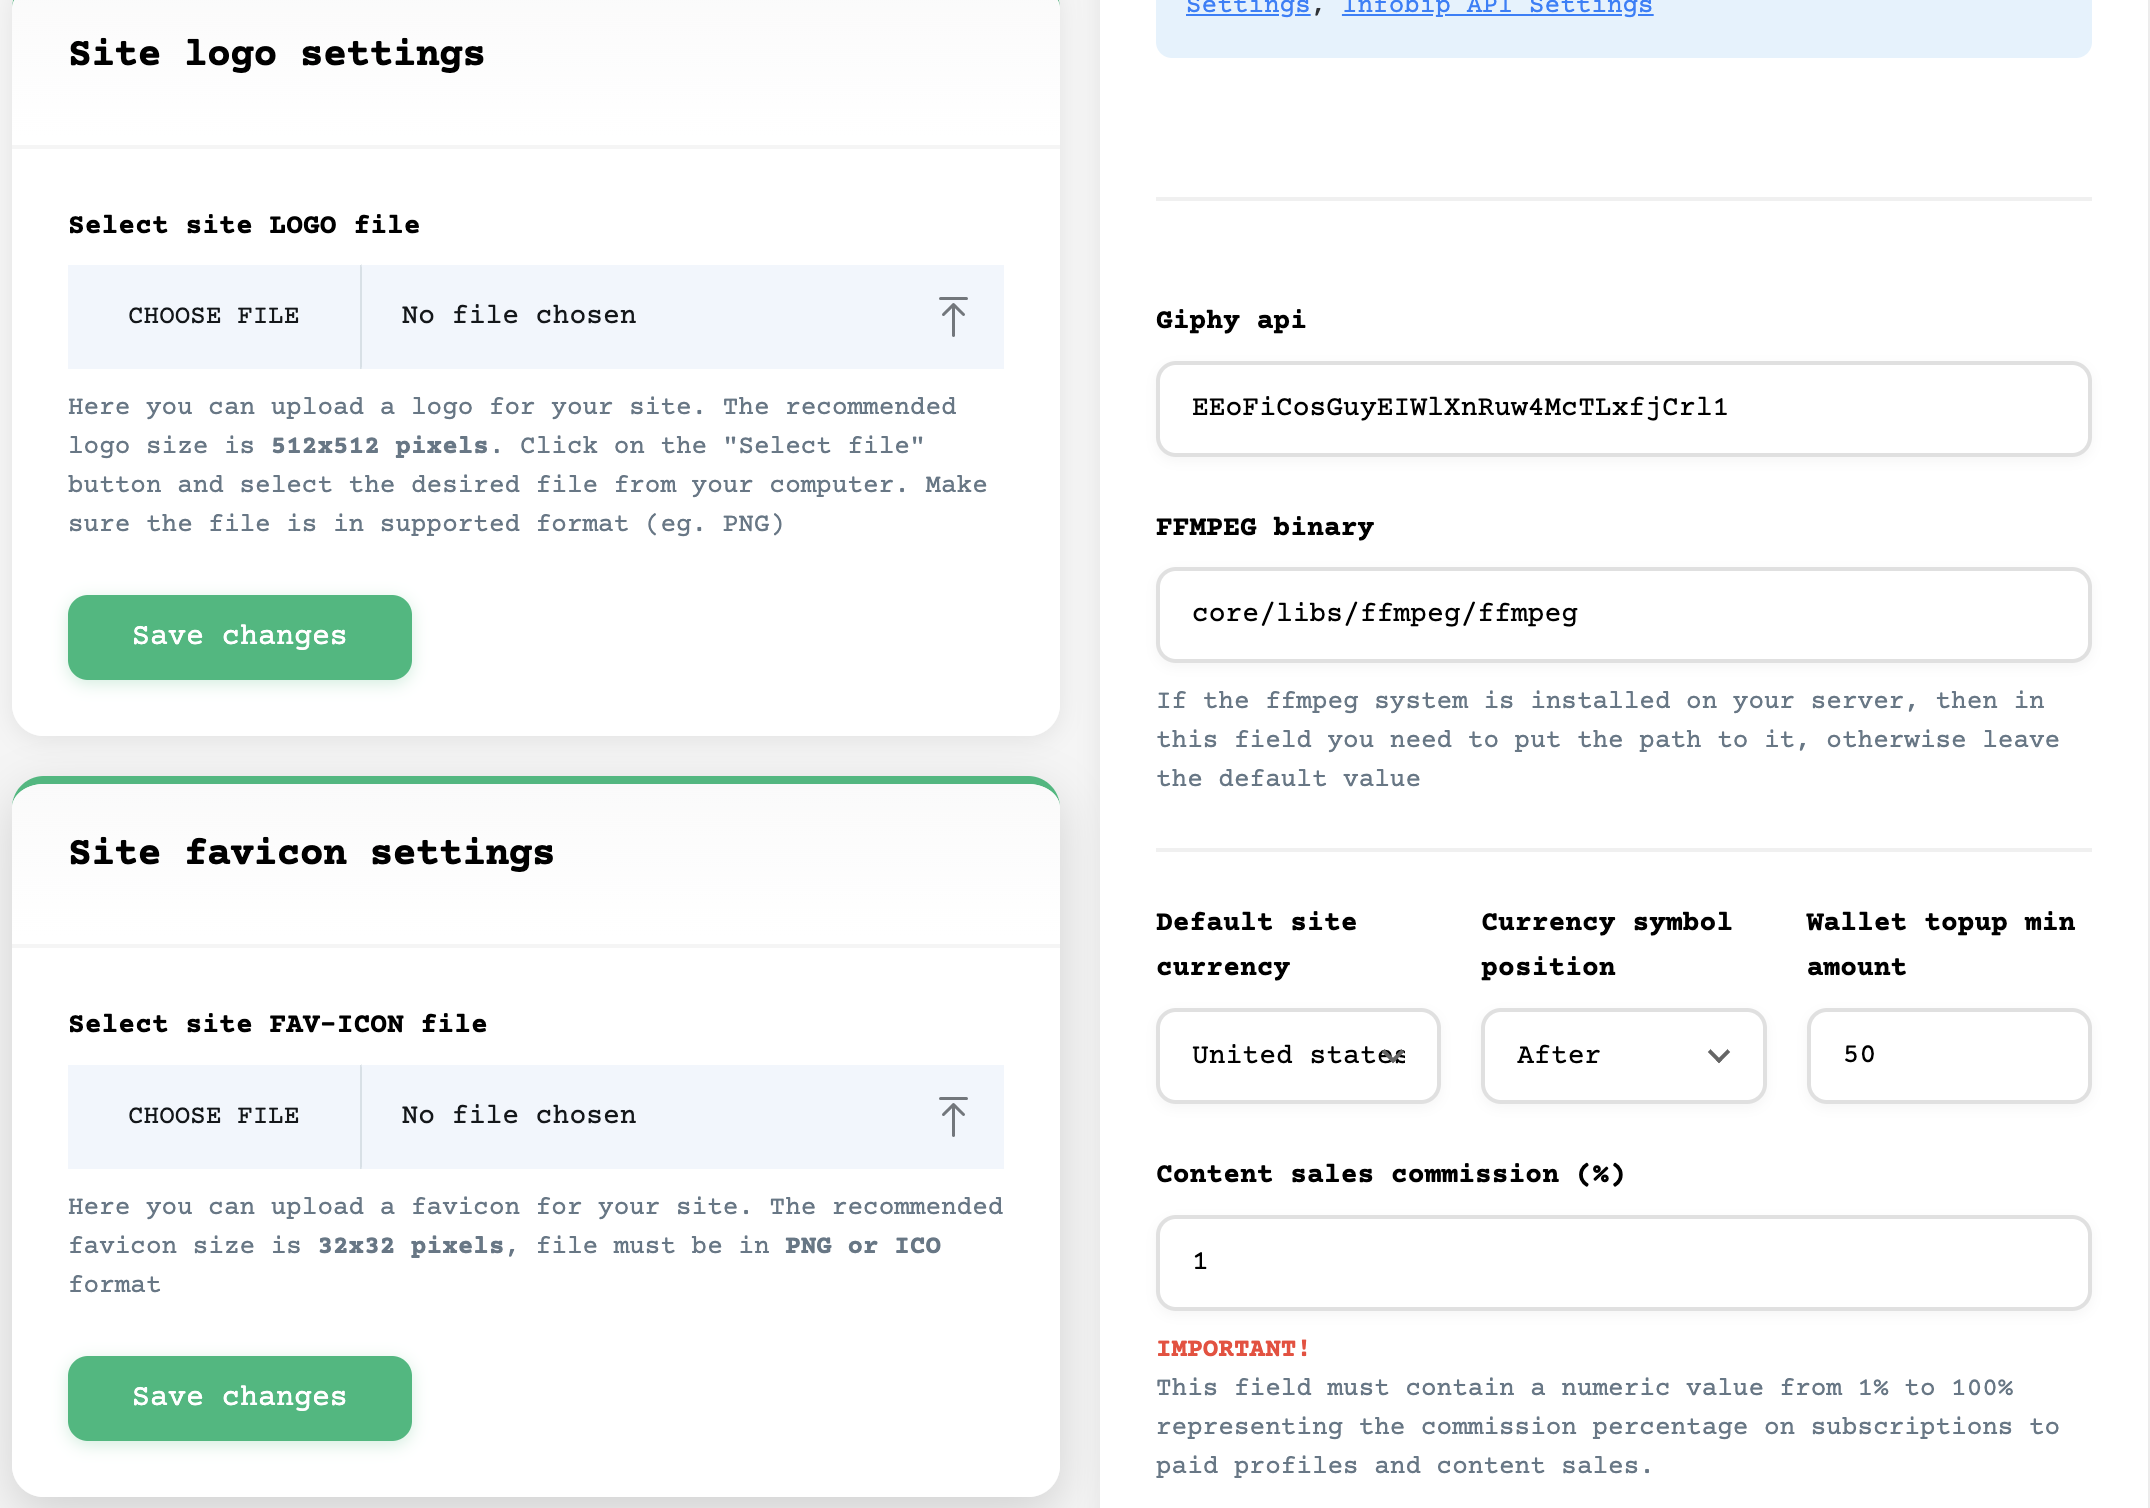
- Primary Color: Main brand color (default: #00ba7b)
- Logo: Upload your platform logo (PNG format recommended, transparent background)
- Favicon: Upload site favicon (32x32px ICO or PNG)
- Cover Image: Default cover image for profiles
UI Themes
Komico includes multiple built-in themes:
- Default Theme: Modern, clean interface
- Dark Theme: OLED-friendly dark mode
- Compact Theme: Dense information display
Languages
Navigate to Themes → UI Languages to manage translations:
- Komico comes with English by default
- Add new languages by uploading JSON language files
- Edit existing translations through the language editor
- Set default language for new users
- Allow users to choose their preferred language
Monetization Features
User Wallet System
Navigate to Monetization → Wallet Settings:
- Enable Wallet: Turn user wallet system on/off
- Currency: Set your platform currency (USD, EUR, INR, etc.)
- Currency Symbol: Display symbol ($, €, ₹, etc.)
- Minimum Deposit: Minimum amount users can add to wallet
- Minimum Withdrawal: Minimum amount users can withdraw
- Withdrawal Fee: Platform commission on withdrawals (%)
Activity Monetization
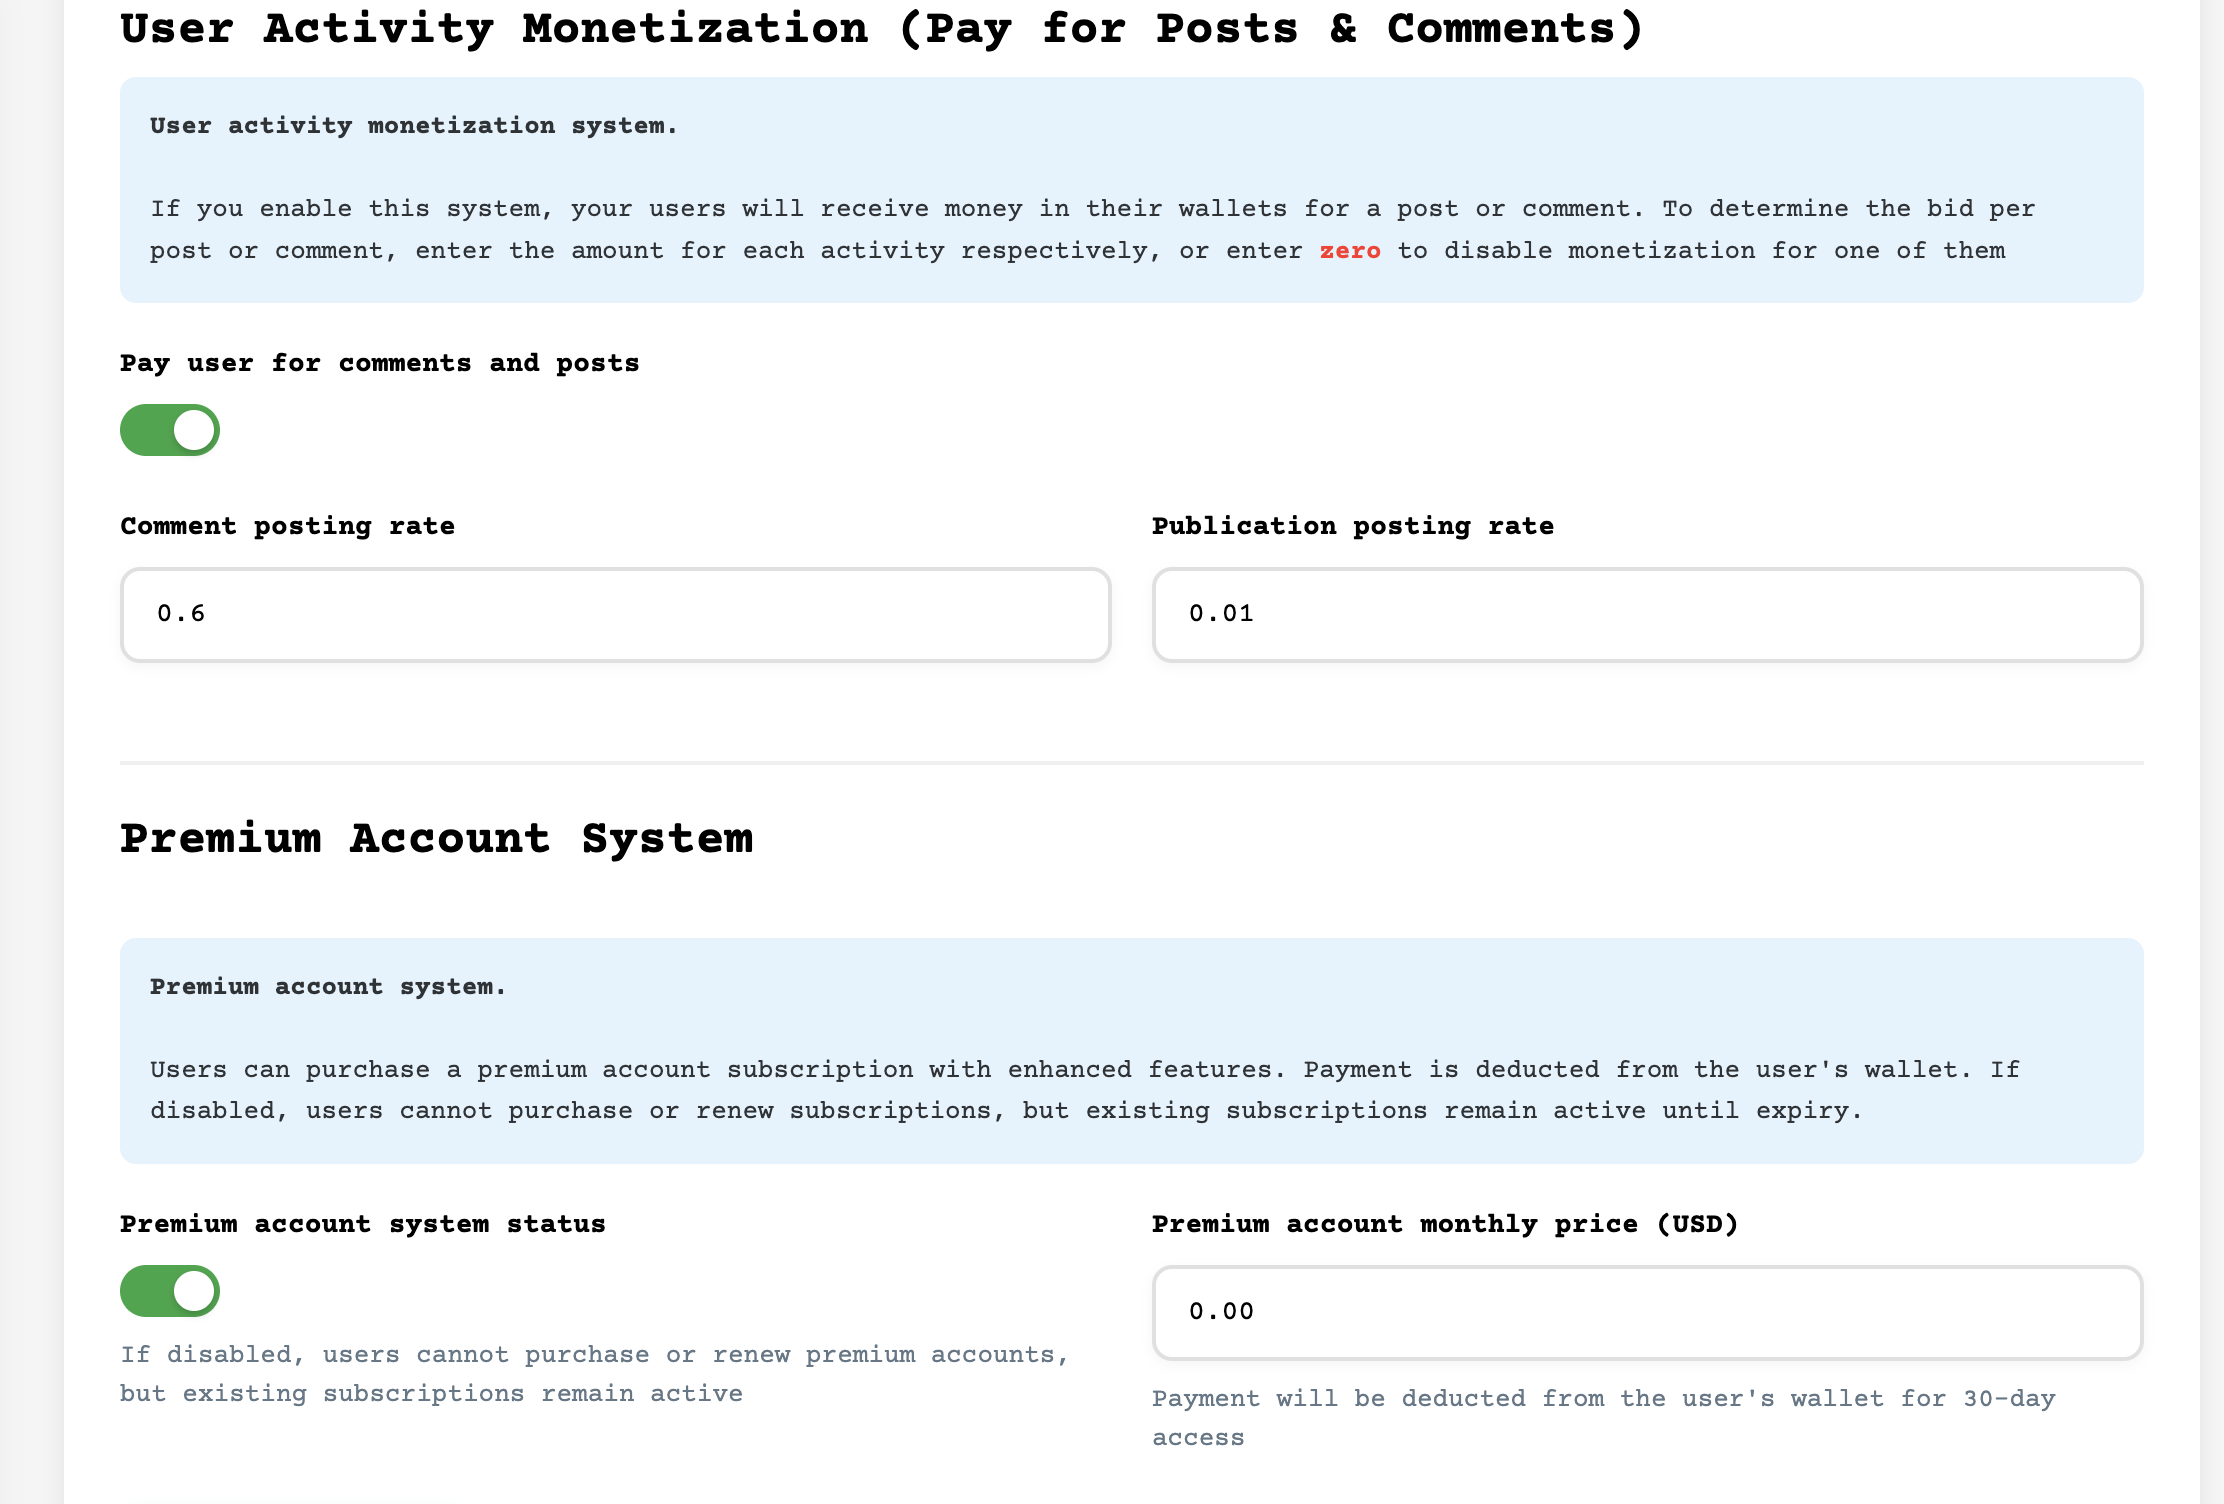
Pay users for their activity on your platform:
- Enable Activity Monetization: Turn feature on/off
- Payment Per Post: Amount users earn per post
- Payment Per Comment: Amount users earn per comment
- Set to 0 to disable any specific activity reward
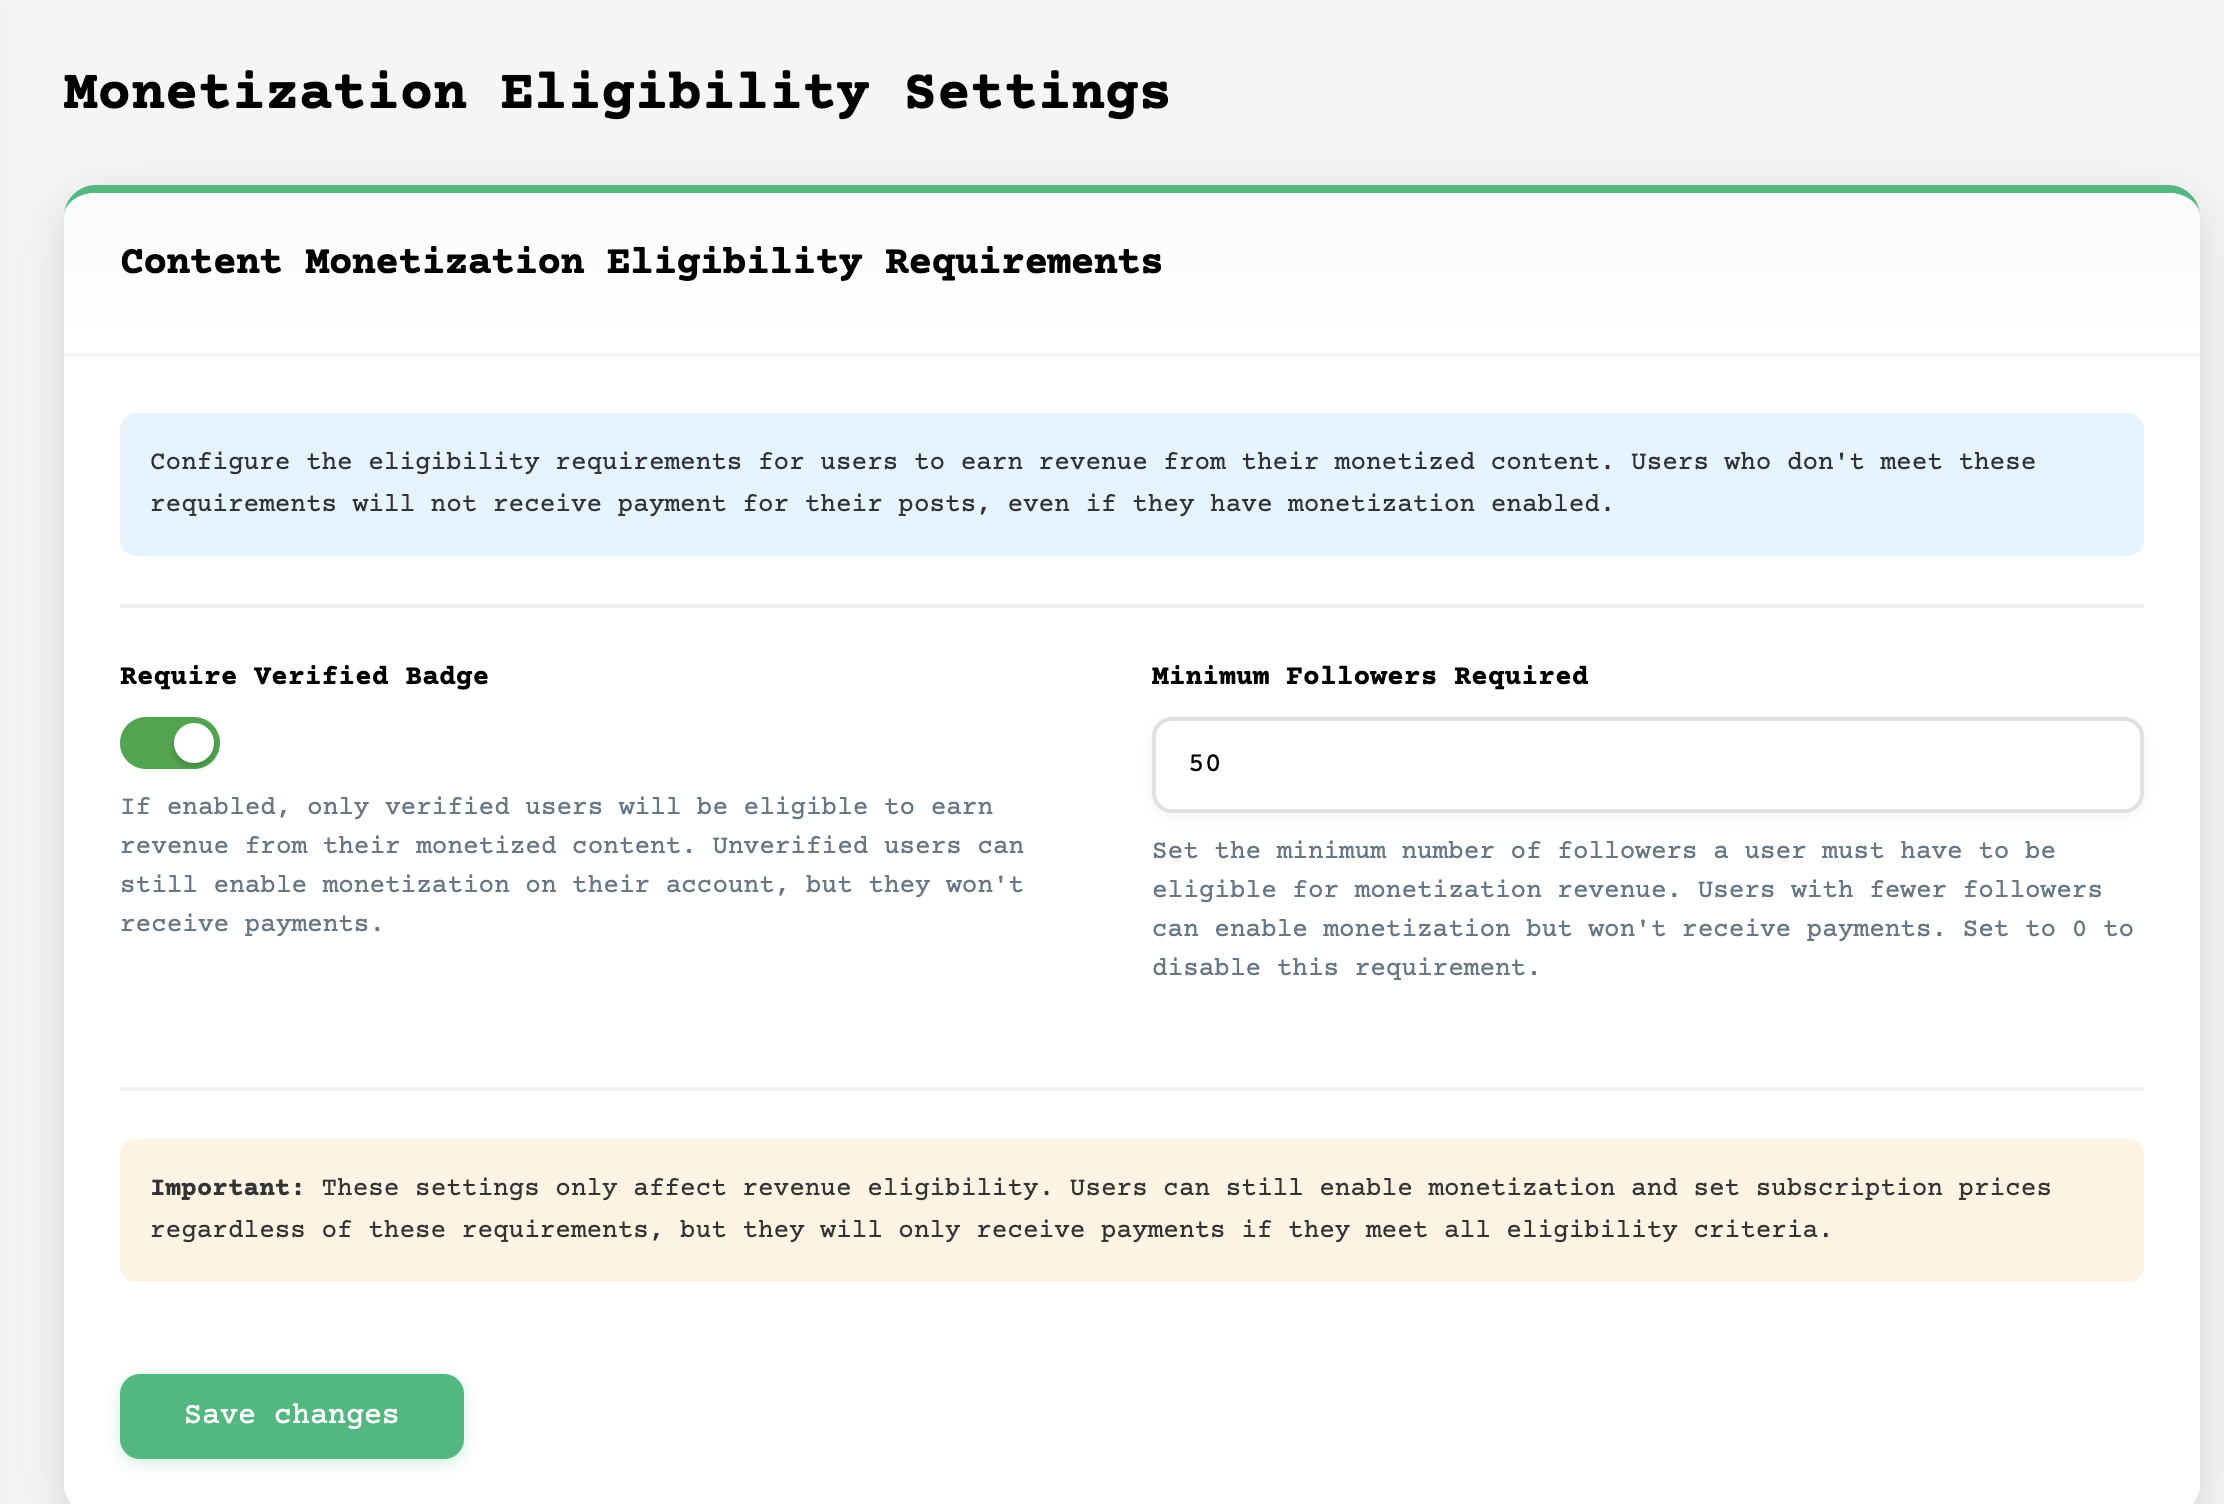
Content Subscription
Allow users to charge for exclusive content:
- Users set monthly subscription price for their content
- Subscribers pay to access exclusive posts
- Revenue split between platform and content creator
- Configure platform commission percentage
Premium Accounts
Offer premium membership to users:
- Enable Premium Accounts: Turn feature on/off
- Monthly Price: Cost for premium membership
- Premium Features: Customize benefits:
- Verified badge
- No advertisements
- Higher upload limits
- Priority support
- Custom themes
Advertisement System
Navigate to Advertising → Settings:
- User Ads: Allow users to create promoted posts
- Cost Per Click (CPC): Set price per ad click
- Cost Per Impression (CPM): Set price per 1000 views
- Minimum Budget: Minimum ad campaign budget
- Ad Review: Enable manual approval of ads
Affiliate System
Create an affiliate program to grow your platform:
- Enable Affiliates: Turn program on/off
- Commission Per Referral: Amount paid per new user
- Cookie Duration: How long referral cookie lasts (days)
- Minimum Payout: Minimum balance for affiliate withdrawal
- Approval Required: Manually approve affiliates
Key Features Overview
Komico comes packed with features to create a comprehensive social networking experience:
Social Features
- User Profiles: Customizable profiles with avatar, cover, bio, and portfolio
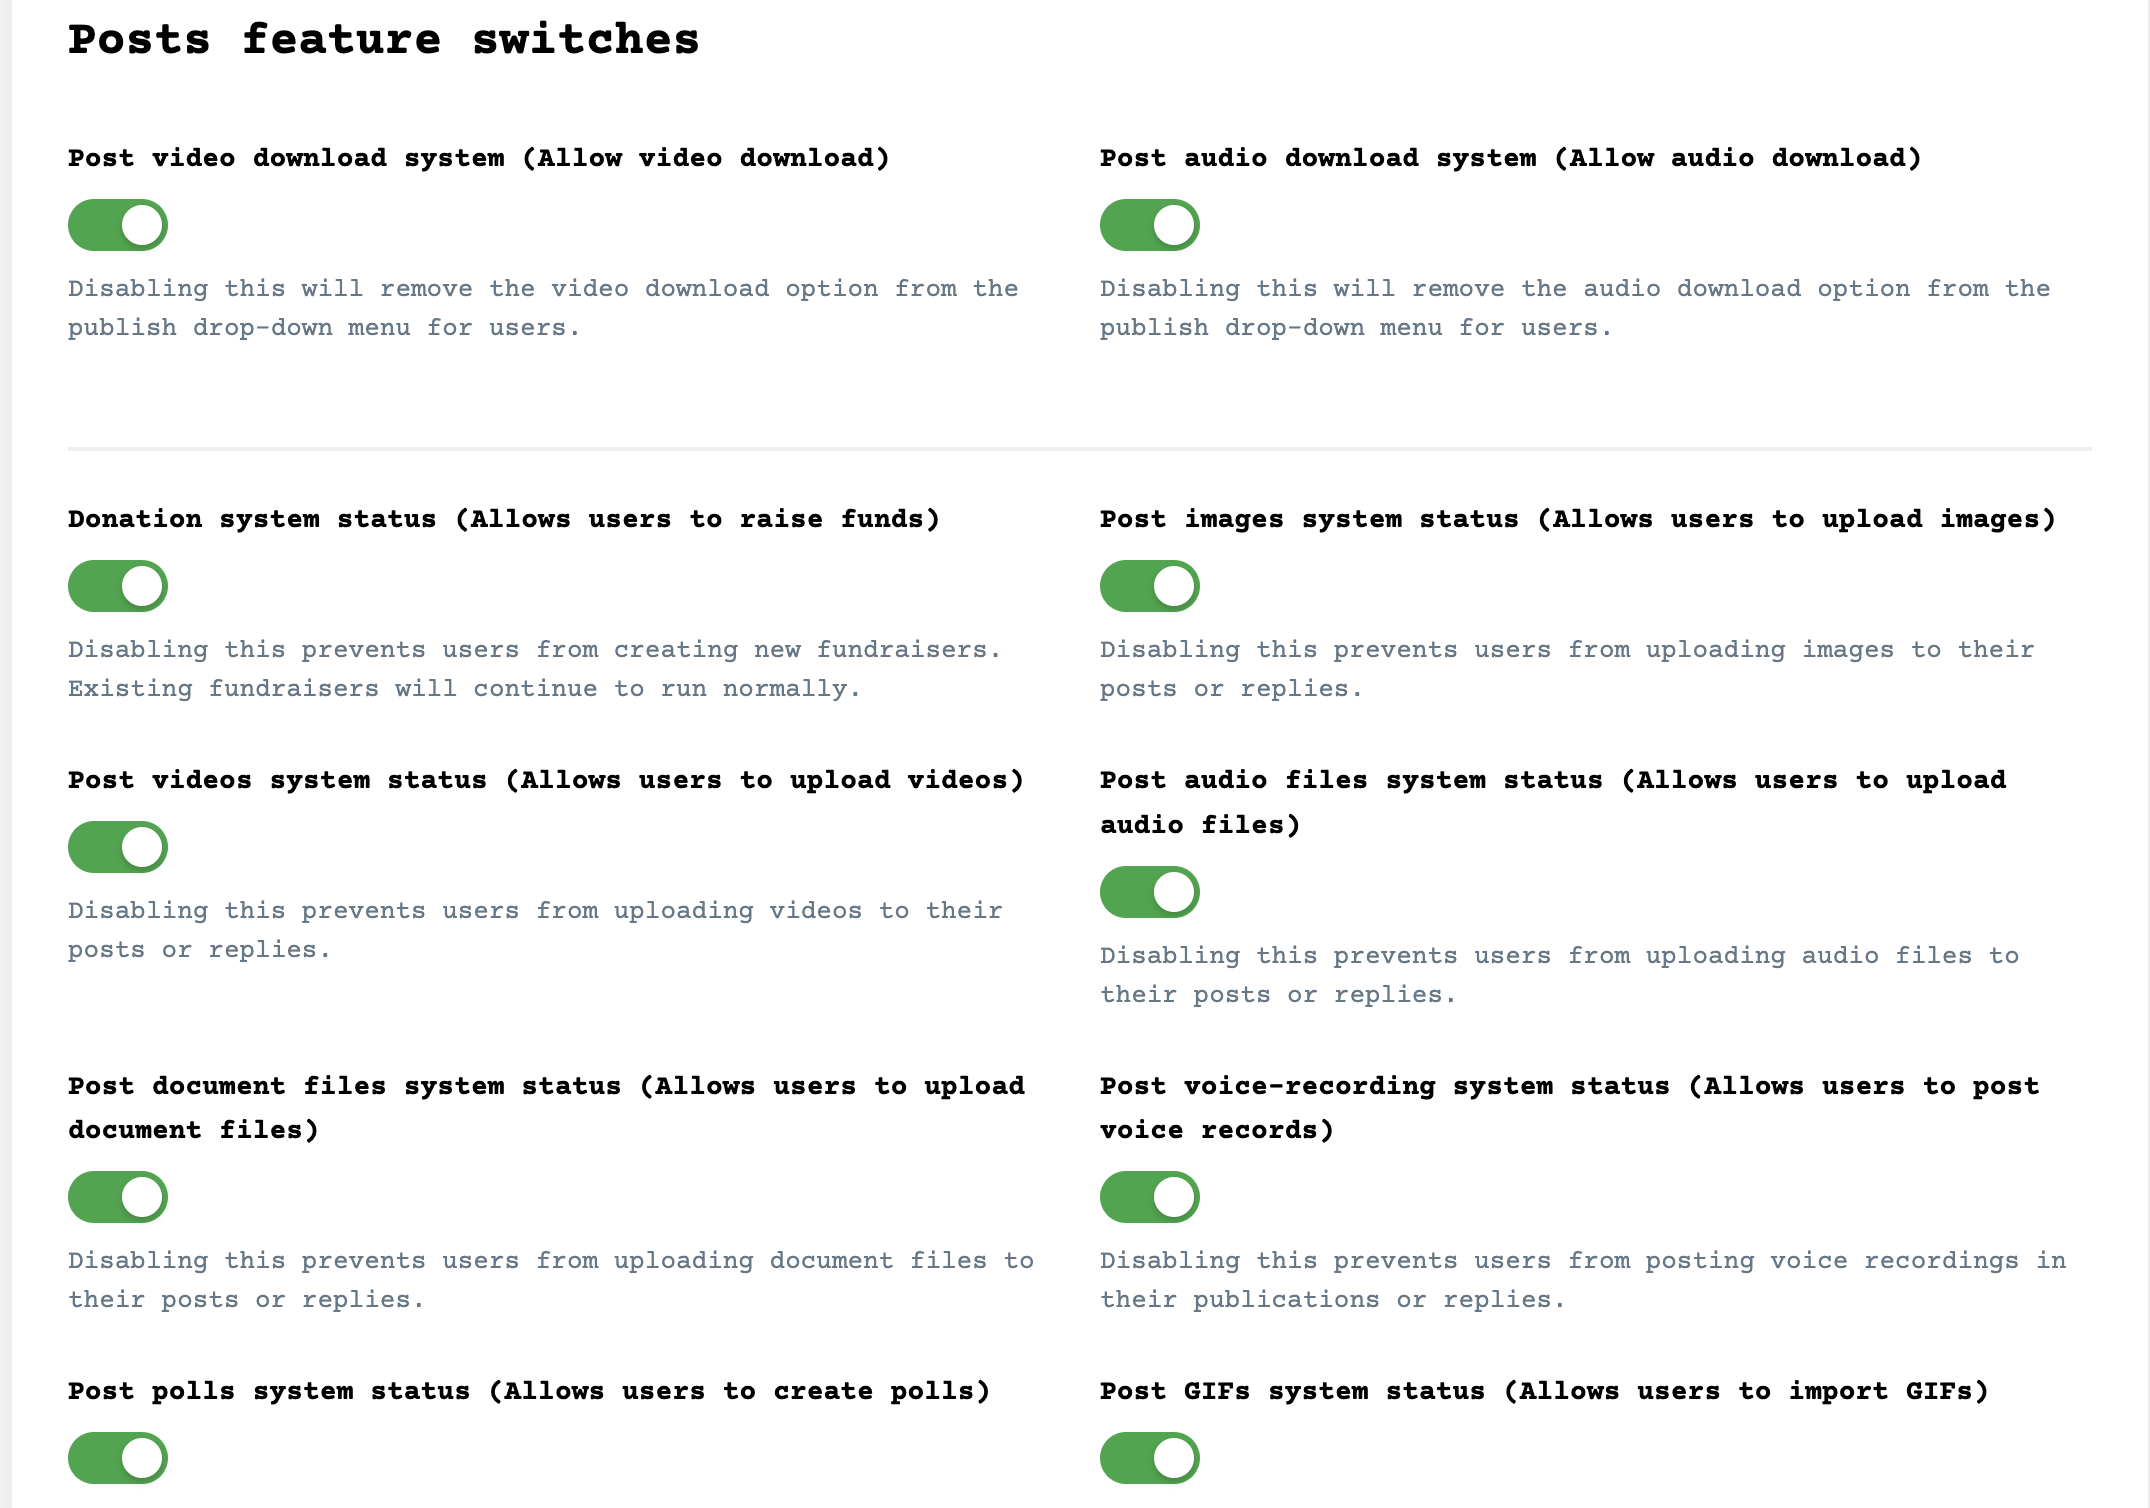
- Posts & Timeline: Text, images, videos, polls, GIFs support
- Stories: 24-hour temporary stories with views tracking
- Reels: Short-form vertical video content
- Direct Messaging: Real-time private conversations
- Group Chats: Create and manage group conversations
- Follow System: Follow users, accept/reject follow requests
- Notifications: Real-time activity notifications
- Search: Find users, posts, hashtags
- Hashtags: Discover trending topics
- Bookmarks: Save posts for later
- Likes & Comments: Engage with content
- Share & Repost: Spread content across platform
Content Features
- Media Uploads: Images, videos, audio files
- Polls: Create interactive polls with multiple options
- GIF Integration: Powered by Giphy API
- Link Previews: Rich previews for shared URLs
- Mentions: @mention other users
- Privacy Controls: Public, private, or followers-only posts
- Content Pinning: Pin important posts to profile
Monetization Features
- User Wallet: Built-in wallet system
- Multiple Payment Gateways: PayPal, Stripe, Razorpay
- Activity Rewards: Pay users for engagement
- Content Subscriptions: Exclusive paid content
- Premium Memberships: Subscription-based premium features
- User Advertisements: Self-serve ad platform
- Affiliate Program: Referral commissions
- Withdrawals: Automated payout processing
Administration Features
- Dashboard: Comprehensive admin dashboard with analytics
- User Management: Manage, edit, suspend users
- Content Moderation: Review and manage reported content
- Reports System: Handle user and content reports
- Verification Badges: Manually verify accounts
- Backup System: Automated database backups
- System Updates: One-click updates
- Custom CSS/JS: Add custom styling and scripts
- Static Pages: Manage About, Privacy Policy, Terms
Advanced Features
- REST API: Complete API for mobile apps and integrations
- OAuth Integration: Login with Google, Facebook, Twitter
- Cloud Storage: AWS S3, Wasabi, iDrive, DigitalOcean Spaces
- Mobile Responsive: Fully responsive design for all devices
- SEO Optimized: Built-in SEO features and sitemap
- RTL Support: Right-to-left language support
- Multi-language: Unlimited language support
- reCAPTCHA: Spam protection with Google reCAPTCHA
Third-Party Integrations
Payment Processing
PayPal
Navigate to Monetization → Payment Gateways → PayPal
- Get API credentials from PayPal Developer
- Supports both Sandbox (testing) and Live modes
- Instant payment confirmations via webhooks
Stripe
Navigate to Monetization → Payment Gateways → Stripe
- Get API keys from Stripe Dashboard
- Supports credit cards, digital wallets (Apple Pay, Google Pay)
- Built-in fraud protection
Razorpay
Navigate to Monetization → Payment Gateways → Razorpay
- Popular in India and Southeast Asia
- Supports UPI, NetBanking, Cards, Wallets
- Instant settlements available
Cloud Storage Integration
Offload media storage to cloud services for better performance and scalability.
Amazon S3
Navigate to System → AWS S3 Settings
- Create an AWS account at AWS
- Create an S3 bucket in your preferred region
- Create IAM user with S3 permissions
- Generate Access Key ID and Secret Access Key
- In Komico, enter:
- Bucket Name
- Bucket Region
- Access Key ID
- Secret Access Key
- Enable S3 storage
Wasabi
Cost-effective alternative to S3 with S3-compatible API:
- 80% cheaper than AWS S3
- Free egress (data transfer out)
- Setup similar to AWS S3
iDrive e2
Another S3-compatible option with competitive pricing
DigitalOcean Spaces
Simple, developer-friendly object storage
SMS & Email Services
Twilio (SMS)
Navigate to System → Twilio Settings
- Used for phone number verification and SMS notifications
- Get credentials from Twilio Console
- Configure Account SID, Auth Token, and Phone Number
Infobip (SMS)
Alternative SMS provider with global coverage:
- Navigate to System → Infobip Settings
- Good for international SMS
- Competitive pricing
SMTP Email
Configure any SMTP service:
- Gmail (with App Password)
- SendGrid
- Mailgun
- Amazon SES
- Your hosting provider's SMTP
Social Authentication
Navigate to System → OAuth Settings to enable social login:
Google Login
- Go to Google Cloud Console
- Create a new project
- Enable Google+ API
- Create OAuth 2.0 credentials
- Add authorized redirect URI:
https://yourdomain.com/oauth/google - Copy Client ID and Client Secret to Komico
Facebook Login
- Go to Facebook Developers
- Create a new app
- Add Facebook Login product
- Configure OAuth redirect URI
- Copy App ID and App Secret to Komico
Twitter Login
- Go to Twitter Developer Portal
- Create a new app
- Enable OAuth 1.0a or OAuth 2.0
- Configure callback URL
- Copy API keys to Komico
Other Integrations
Google reCAPTCHA
Prevent spam and bot registrations:
- Get keys from Google reCAPTCHA
- Choose reCAPTCHA v2 or v3
- Add your domain
- Copy Site Key and Secret Key to Komico
- Navigate to System → reCAPTCHA and paste keys
Giphy GIFs
Enable GIF search in posts and messages:
- Create account at Giphy Developers
- Create a new app
- Get your API key
- Navigate to System → General Settings
- Paste Giphy API key
Google Ads / Custom Ads
Monetize your platform with display advertising:
- Navigate to Advertising → Custom Ads
- Add Google AdSense code
- Or add custom HTML/JavaScript ad codes
- Configure ad placements (header, sidebar, feed)
Mobile Applications
Komico offers mobile applications for both Android and iOS platforms, sold separately.
Features of Mobile Apps
- ✅ Android and iOS mobile applications
- ✅ Full push notification support
- ✅ Optimized performance and battery usage
- ✅ Camera and media integration
- ✅ Offline capabilities for better UX
- ✅ App Store and Google Play deployment assistance
- ✅ Source code included for customization
- ✅ App branding customization
- ✅ Regular updates synchronized with web version
Purchasing Mobile Apps
Get Mobile Apps
The Android and iOS mobile applications are available as separate purchases.
To inquire about mobile apps:
- Visit https://edubrazeal.com
- Create a support ticket
- Mention you own Komico web script
- Request information about mobile app pricing and features
You'll receive:
- Complete source code
- Installation and setup documentation
- Deployment guide for App Store / Play Store
- Push notification API keys and setup
- Technical support for integration
Mobile App Links
Even without purchasing mobile apps, you can configure app download links:
- Navigate to System → Mobile App Links
- Enter Google Play Store URL (Android)
- Enter Apple App Store URL (iOS)
- These links appear in web version prompts
Troubleshooting Common Issues
Installation Problems
Database Connection Failed
Error: "Database connection failed" or "Access denied for user"
Solutions:
- Verify database credentials are correct
- Ensure database user has ALL PRIVILEGES on the database
- Check if database host is correct (try
localhostor127.0.0.1) - Contact your hosting provider to verify MySQL service is running
- Check if your IP is whitelisted (for remote databases)
White Screen After Installation
Solutions:
- Check PHP error logs in
core/logs/directory - Ensure all files were uploaded completely
- Verify file permissions on
upload/,core/,themes/ - Clear browser cache and cookies
- Check if
.htaccessfile exists in root directory
500 Internal Server Error
Solutions:
- Check Apache/Nginx error logs
- Verify
.htaccesssyntax (Apache only) - Check PHP version meets minimum requirement (7.4+)
- Ensure mod_rewrite is enabled (Apache)
- Check file permissions aren't too restrictive
Performance Issues
Slow Page Loading
Solutions:
- Enable cloud storage (S3, Wasabi) to offload media
- Increase PHP memory limit to 256MB or higher
- Enable MySQL query caching
- Use a CDN for static assets
- Optimize images before uploading
- Consider upgrading server resources
Media Upload Failures
Solutions:
- Check
upload/directory is writable - Increase PHP
upload_max_filesizeandpost_max_size - Increase
max_execution_timefor large files - Verify GD extension is installed for image processing
- Check available disk space on server
Email & Notification Issues
Emails Not Sending
Solutions:
- Test SMTP connection in admin panel
- Verify SMTP credentials are correct
- Check SMTP port (587 for TLS, 465 for SSL)
- Enable "Less secure app access" for Gmail
- Check if emails are in spam folder
- Verify sender email domain has proper SPF/DKIM records
Push Notifications Not Working
Solutions:
- Verify OneSignal App ID and API Key are correct
- Check if HTTPS is enabled (required for web push)
- Ensure
OneSignalSDKWorker.jsis accessible - Test notification from OneSignal dashboard first
- Check browser notification permissions
Payment Issues
Payments Not Processing
Solutions:
- Verify payment gateway API keys are correct
- Check if using Sandbox/Test mode keys in production
- Ensure webhook URLs are configured correctly
- Check payment gateway dashboard for error logs
- Verify SSL certificate is valid (required for payments)
Security Issues
Forgot Admin Password
Solution:
- Access your database via phpMyAdmin
- Navigate to
km_userstable - Find your admin user record
- Click Edit on that row
- In password field, select "MD5" function from dropdown
- Enter new password:
password123 - Save the record
- Log in with username and password
password123 - Immediately change password in admin panel
Security Warning: Change the password immediately after regaining access!
Support & Updates
Getting Support
Need Help?
If you encounter any issues or have questions about Komico:
- Check this documentation first - most questions are answered here
- Visit our support portal: https://edubrazeal.com
- Create a support ticket with:
- Your Komico purchase code
- Detailed description of the issue
- Screenshots if applicable
- Error messages from logs
- Steps to reproduce the problem
- Response time: Usually within 24-48 hours
Email: edu@edubrazeal.com
Website: https://edubrazeal.com
Updates & Changelog
Komico receives regular updates with new features, bug fixes, and security patches.
Checking for Updates
- Log in to admin panel
- Navigate to System → Updates
- Check current version vs. available version
- Review changelog before updating
Installing Updates
Important: Always backup your database and files before updating!
- Navigate to System → Backups
- Create a full backup and download it
- Go to System → Updates
- Click "Download Update"
- Follow the update wizard instructions
- Test your site thoroughly after updating
Best Practices
- ✅ Keep Komico updated to the latest version
- ✅ Regular automated backups (daily or weekly)
- ✅ Use strong passwords for admin accounts
- ✅ Enable two-factor authentication when available
- ✅ Monitor server resources and scale as needed
- ✅ Use HTTPS/SSL for security and trust
- ✅ Configure proper file permissions
- ✅ Enable reCAPTCHA to prevent spam
- ✅ Regularly review reported content and users
- ✅ Test payment systems in sandbox mode first
Server Optimization Tips
- Use PHP 8.0+ for better performance
- Enable OPcache for PHP
- Use Redis or Memcached for caching
- Offload media to cloud storage (S3, Wasabi)
- Use a CDN for static assets
- Enable gzip compression
- Optimize MySQL/MariaDB configuration
- Use HTTP/2 for faster page loads
- Implement lazy loading for images
Community & Resources
- Demo: https://komico.edubrazeal.com
- Author Website: https://edubrazeal.com
- Documentation: This file (keep it handy!)